Designing a Login with OTP Flow: A Practical Tutorial
⚠️ This post is generated by LLM, read with caution.

If you’ve ever signed in to an app by typing a 6-digit code from a text message or email, you’ve used an OTP (one-time password) login. It’s a great fit when you want to lower friction while keeping a reasonable security bar: no passwords to remember, and no “forgot password” flows to build.
In this tutorial we’ll design a complete OTP login flow from scratch: the endpoints, the data model, the state machine, and (most importantly) the security decisions that separate a solid implementation from one that gets abused within a week of going live.
The code samples are TypeScript-flavored pseudo code. Nothing here is framework-specific, so the design translates directly to Java, Go, Python, or anything else.
What we’re building
The user experience is deliberately simple:
- The user enters their phone number or email.
- We send them a short-lived one-time code.
- They type the code, and if it matches, they’re logged in.
Two endpoints are enough:
| Endpoint | Purpose |
|---|---|
POST /auth/otp/request | Generate a code and deliver it via SMS/email |
POST /auth/otp/verify | Check the code and create a session |
Simple on the surface, but each endpoint hides a handful of decisions that really matter. Let’s start with the big picture.
The full flow, end to end
Here’s the whole journey as a sequence diagram:
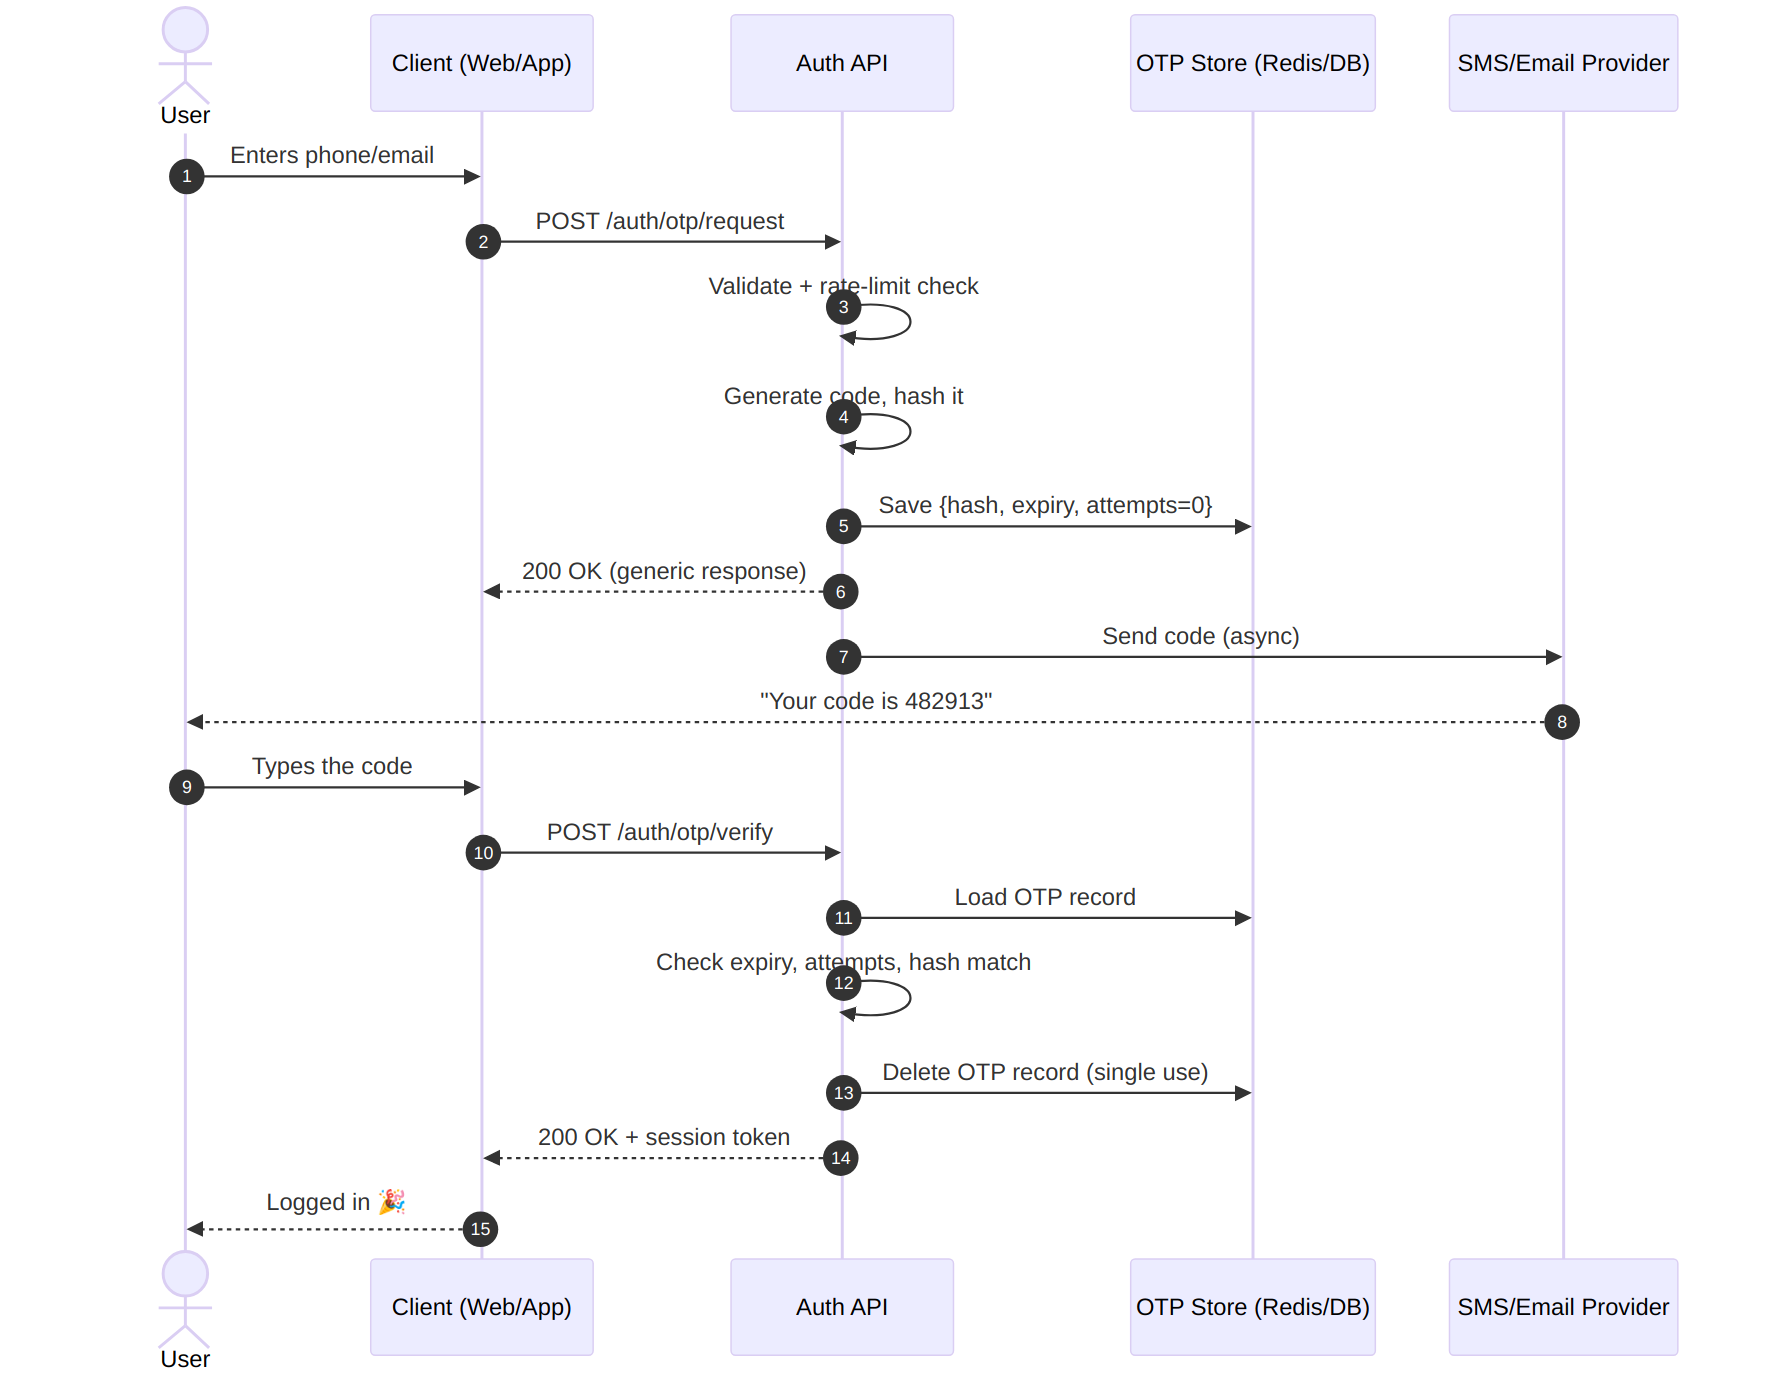
A few things worth calling out before we zoom in:
- The code is hashed before it’s stored (steps 4-5). If your Redis snapshot or database backup leaks, plain-text codes shouldn’t leak with it.
- The response to the client is generic (step 6). It doesn’t reveal whether the account exists. More on that in a moment.
- Delivery is async (step 7). SMS providers can take seconds to respond; you don’t want your login endpoint’s latency tied to theirs.
- The record is deleted the moment it’s used (step 13). One code, one login. No replays.
The data model
Everything we need fits in one small record, keyed by the identifier (phone/email):
interface OtpRecord {
  identifier: string;    // "+84901234567" or "[email protected]"
  codeHash: string;      // HMAC-SHA256(code, serverSecret), never the raw code
  expiresAt: Timestamp;  // now + 5 minutes
  attempts: number;      // failed verify attempts so far
  createdAt: Timestamp;
}
Redis is a natural home for this, since the TTL gives you expiry for free:
SET otp:{identifier} {record} EX 300A database table works just as well; you’ll simply check expiresAt yourself and clean up old rows with a periodic job.
Why hash the code? A 6-digit code has only 1,000,000 possibilities, so a plain hash like SHA-256 can be brute-forced offline in milliseconds if the store leaks. Use an HMAC with a server-side secret instead: without the secret, the stolen hashes are useless.
Step 1: Requesting a code
This endpoint looks trivial and is where most real-world OTP systems get hurt. Two attack patterns to design against from day one:
- SMS pumping / toll fraud: bots request thousands of codes to premium-rate numbers, and you pay the SMS bill.
- Account enumeration: attackers probe identifiers and use response differences to learn which ones have accounts.
Here’s the request flow with the guardrails in place:
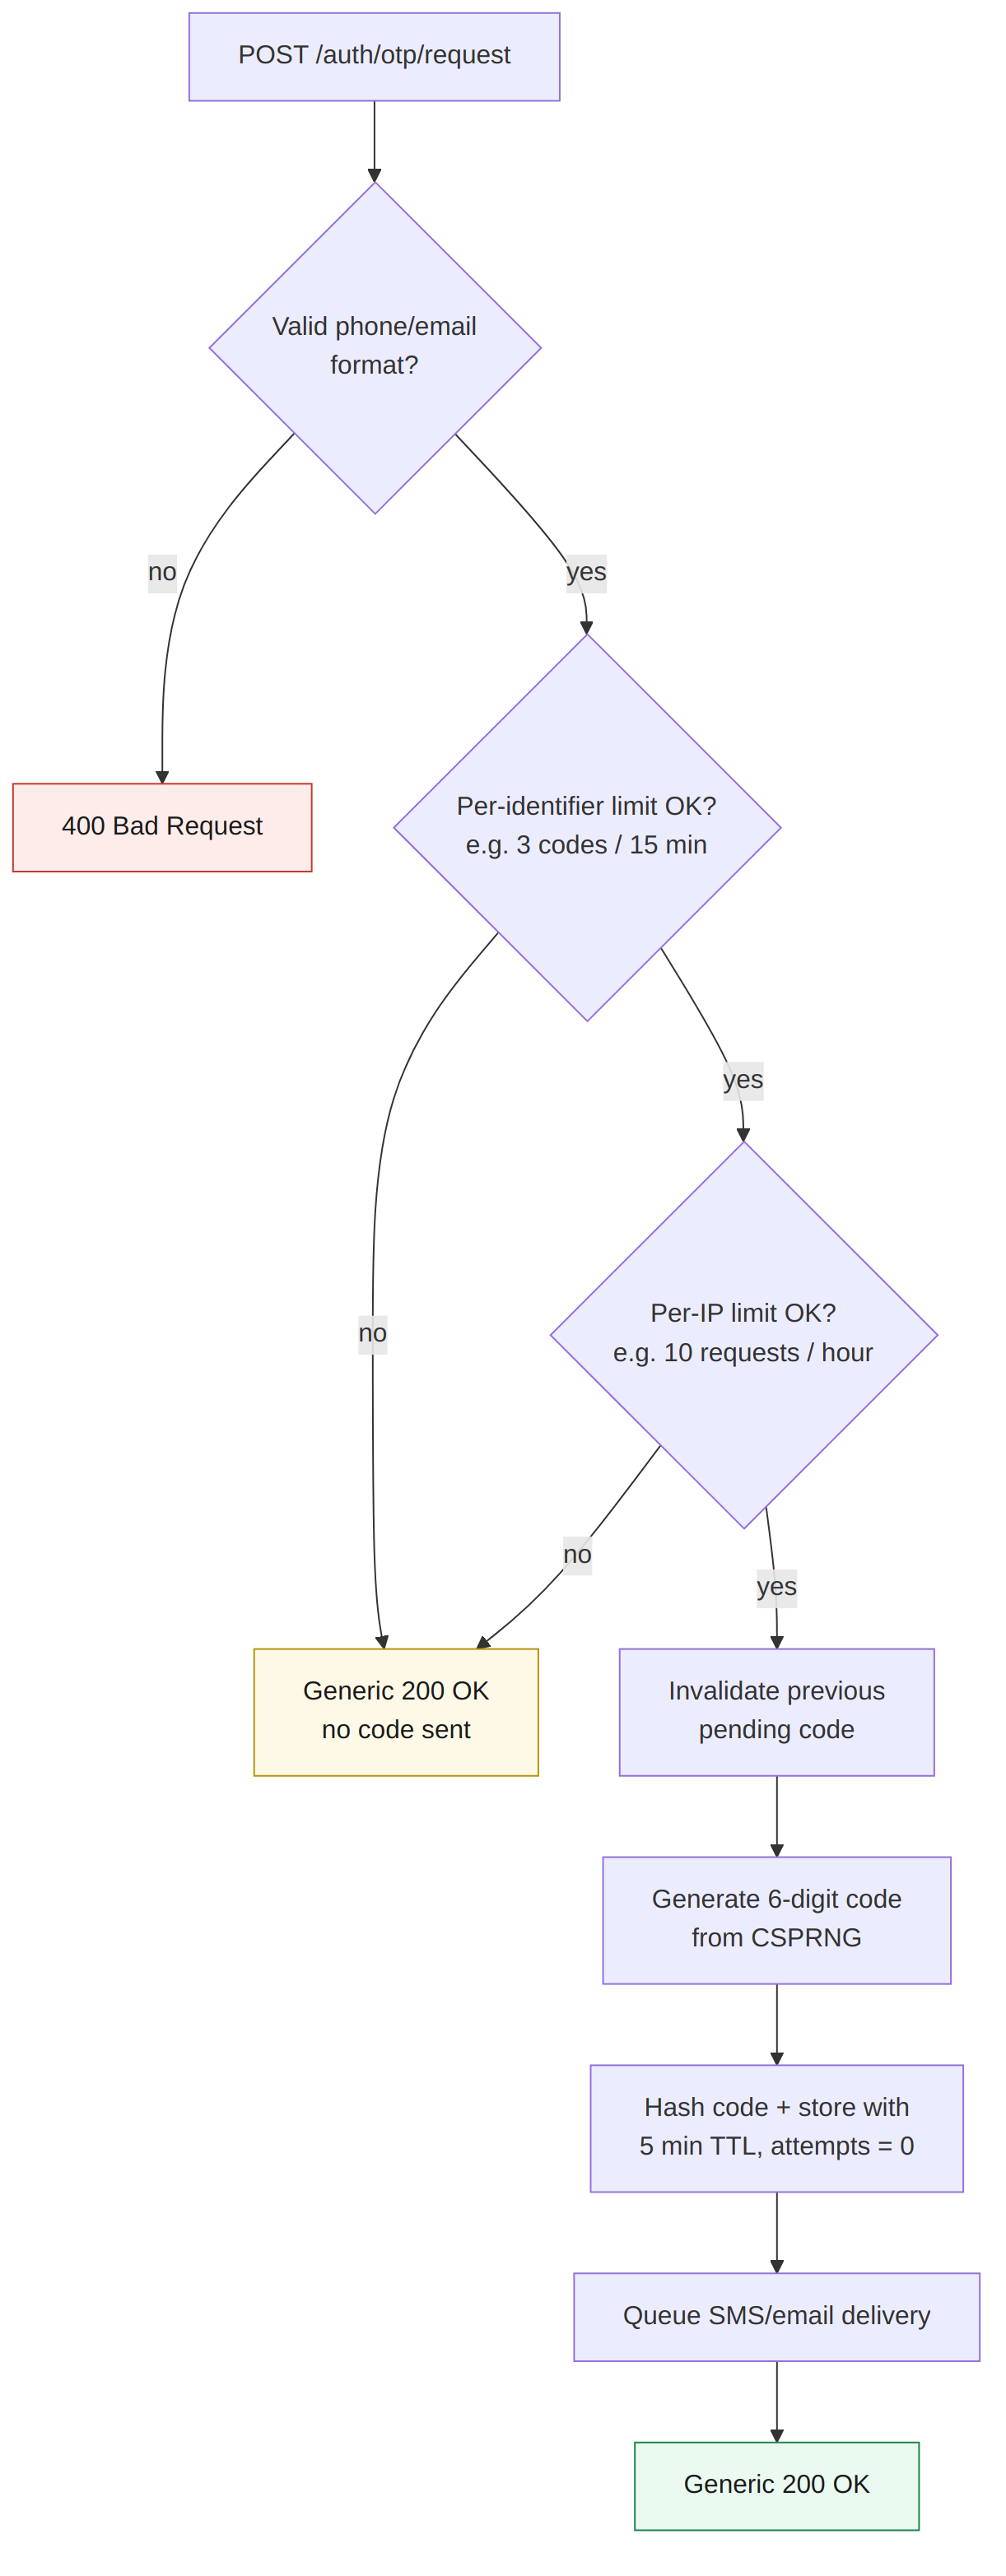
And in code:
const OTP_TTL_SECONDS = 300;        // 5 minutes
const MAX_CODES_PER_WINDOW = 3;     // per identifier, per 15 min
const MAX_REQUESTS_PER_IP = 10;     // per hour

async function requestOtp(identifier: string, clientIp: string) {
  if (!isValidPhoneOrEmail(identifier)) {
    throw new BadRequestError("Invalid identifier format");
  }

  // Rate limits: fail CLOSED, but respond generically.
  const overIdentifierLimit = await rateLimiter.isOver(
    `otp-id:${identifier}`, MAX_CODES_PER_WINDOW, "15m");
  const overIpLimit = await rateLimiter.isOver(
    `otp-ip:${clientIp}`, MAX_REQUESTS_PER_IP, "1h");

  if (overIdentifierLimit || overIpLimit) {
    return genericOk(); // same response as success, no signal to attackers
  }

  // One pending code per identifier: a new request replaces the old code.
  await otpStore.delete(identifier);

  const code = generateCode(6);          // CSPRNG, see below
  await otpStore.save({
    identifier,
    codeHash: hmacSha256(code, SERVER_SECRET),
    expiresAt: now().plusSeconds(OTP_TTL_SECONDS),
    attempts: 0,
    createdAt: now(),
  });

  // Fire-and-forget: don't block the response on the SMS provider.
  deliveryQueue.enqueue({ identifier, code });

  return genericOk();
}
The generateCode helper deserves its own note, because this is a classic mistake:
import { randomInt } from "node:crypto";

function generateCode(digits: number): string {
  // crypto.randomInt is a CSPRNG. Math.random() is NOT:
  // its output can be predicted after observing a few values.
  return randomInt(0, 10 ** digits).toString().padStart(digits, "0");
}
And the generic response, always the same shape regardless of what happened:
{ "message": "If the identifier is registered, a code has been sent." }Whether the account exists, the rate limit was hit, or the code was actually sent, the caller sees the same thing. The legitimate user learns everything they need from the SMS arriving (or not); the attacker learns nothing.
Step 2: Verifying the code
Verification is a gauntlet of checks, and the order matters: you want to count the failed attempt before comparing, so an attacker can’t fire unlimited guesses.
const MAX_ATTEMPTS = 5;

async function verifyOtp(identifier: string, submittedCode: string) {
  const record = await otpStore.get(identifier);

  // One generic error for every failure mode.
  const fail = () => {
    throw new UnauthorizedError("Invalid or expired code");
  };

  if (!record) fail();                        // never issued, expired, or already used
  if (record.expiresAt < now()) {
    await otpStore.delete(identifier);
    fail();
  }
  if (record.attempts >= MAX_ATTEMPTS) {
    await otpStore.delete(identifier);        // locked: force a fresh code
    fail();
  }

  // Count the attempt BEFORE checking the code.
  await otpStore.incrementAttempts(identifier);

  const submittedHash = hmacSha256(submittedCode, SERVER_SECRET);
  if (!constantTimeEquals(submittedHash, record.codeHash)) {
    fail();
  }

  // Success: the code is single-use. Delete first, then mint the session.
  await otpStore.delete(identifier);

  const user = await users.findOrCreate(identifier);
  return sessions.create(user);               // JWT, session cookie, your call
}
Three details that are easy to miss:
- Constant-time comparison. A naive
===on strings can short-circuit on the first differing character, leaking timing information. Compare the HMACs withcrypto.timingSafeEqual(or your language’s equivalent). - Attempt counting is not optional. A 6-digit code has a 1-in-a-million chance per guess. With 5 attempts, an attacker’s odds are 0.0005%, which is fine. With unlimited attempts and a 5-minute window, a fast script gets uncomfortably close to certainty.
- Delete on every terminal outcome: success, expiry, lockout. A used or dead code should never be verifiable again.
The lifecycle in one picture
Every OTP record moves through a small, strict state machine. If you can implement this diagram faithfully, you’ve covered the edge cases:
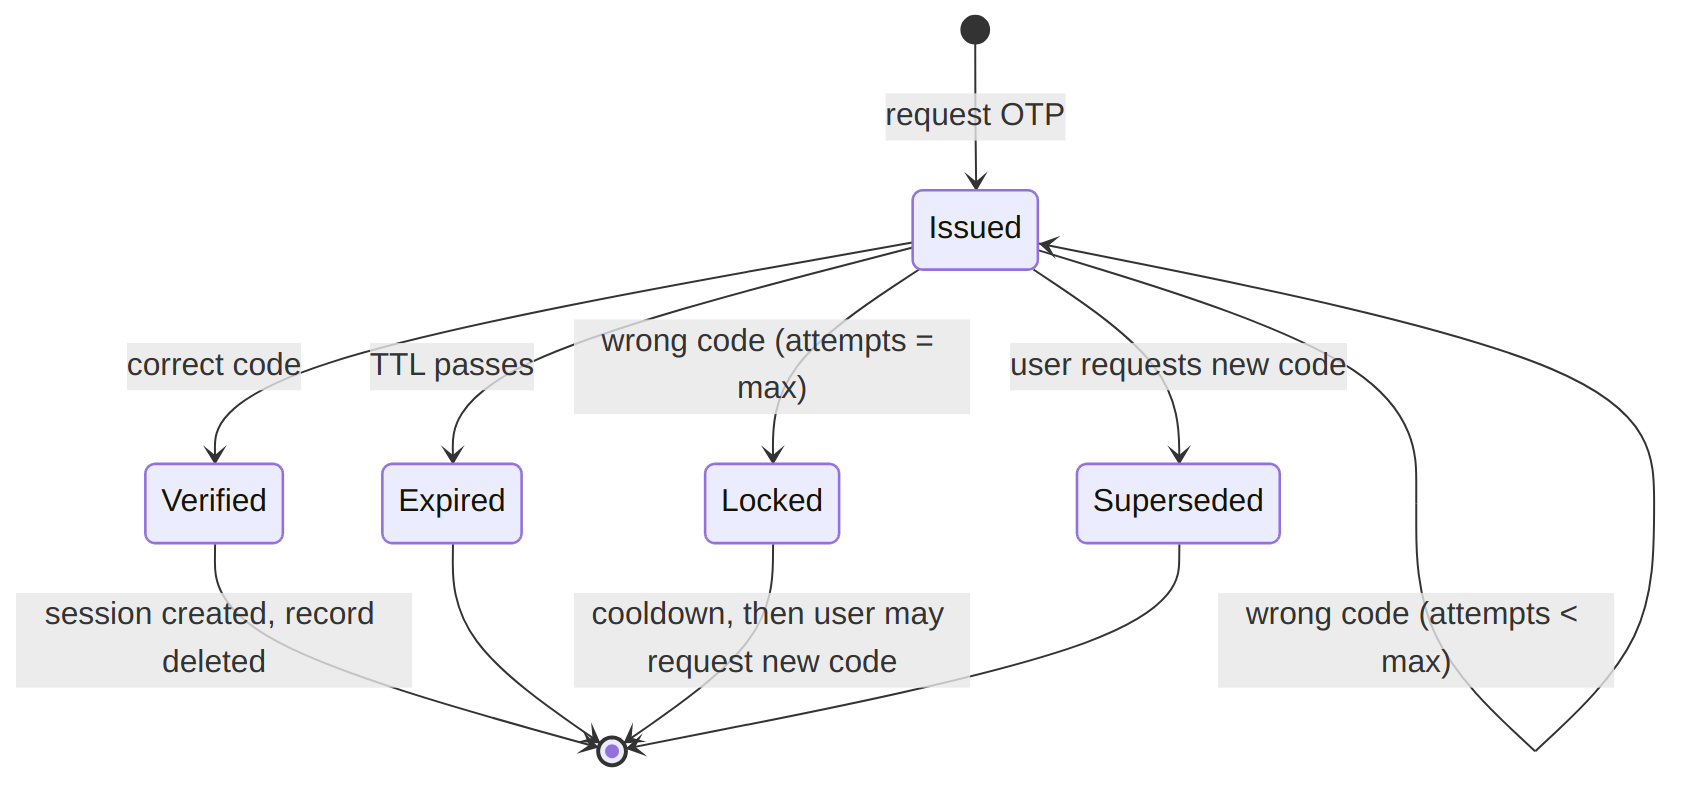
The transition people forget is Superseded: when the user taps “resend code”, the old code must die. If both codes stay valid, you’ve silently doubled the guessing surface. Users also get confused about which code to type, which drives support tickets.
Handling “resend code” gracefully
Resend is just POST /auth/otp/request again, but the UX around it deserves care:
- Client-side cooldown: disable the resend button for 30 to 60 seconds. This alone eliminates most accidental double-sends.
- Server-side, the per-identifier rate limit is the real enforcement (3 codes per 15 minutes in our example). Never trust the client’s cooldown.
- Tell the user what to expect: “We sent a new code. Only the newest code will work.” We invalidate the old one, and users who type the old code will wonder why it fails.
Security checklist
A recap you can lift straight into your design review:
- Codes generated by a CSPRNG, never
Math.random() - Codes stored as HMAC with a server secret, never plain text (a plain hash of a 6-digit code is brute-forceable)
- Short TTL: 5 minutes is plenty
- Single use: deleted on success, expiry, and lockout
- Max 5 verify attempts, counted before the comparison
- Constant-time comparison of hashes
- Rate limits on requesting codes, per identifier and per IP (SMS pumping protection)
- Generic responses everywhere: no account enumeration, no rate-limit signal
- New code request invalidates the previous code
- SMS/email delivery is async, off the request path
Wrapping up
An OTP login is two endpoints and one small record, but the quality of the implementation lives entirely in the details: hashing the code, counting attempts before comparing, keeping responses generic, and rate-limiting the request endpoint before the fraud bill arrives.
From here, natural next steps are:
- TOTP (authenticator apps): same verification mindset, but codes are derived from a shared secret and a clock instead of being delivered, so there’s no SMS cost and no interception risk.
- Magic links: the email cousin of OTP; most of this design (single use, TTL, generic responses) carries over directly.
- Step-up authentication: reusing this exact flow to re-verify a logged-in user before sensitive actions like changing a payout account.
Happy building, and may your codes always arrive before they expire.