
Table of Contents
Overview
Recently, I tried to develop a mobile app for my web app at https://ukata.io. One of the biggest challenges was to integrate the login flow with the current sso I have on keycloak. As I was able to address the issue, I create this guide for the ones who needed it.
TLDR;
Here are the steps you need to do in case you want to skip this tutorial
- Configure schema in your app.json
- Configure deep link & configure keycloak client
- Create development build eas
- Install the development build on your phone/table
There code for this post is available here: https://github.com/datmt/expo-keycloak
Here are the step by step
Configure app schema in app.json
This is like defining the protocol to open your app. When someone click on an URI yourapp://someview your app will open at your app view at someview.
Here is my app.json
{
  "expo": {
    "name": "ukata-mobile",
    "slug": "ukata-mobile",
    "version": "1.0.0",
    "orientation": "portrait",
    "icon": "./assets/images/icon.png",
    "scheme": "ukata.mobile",
    "userInterfaceStyle": "automatic",
    "newArchEnabled": true,
    "ios": {
      "supportsTablet": true
    },
    "android": {
      "package": "io.ukata.mobile",
      "adaptiveIcon": {
        "backgroundColor": "#E6F4FE",
        "foregroundImage": "./assets/images/android-icon-foreground.png",
        "backgroundImage": "./assets/images/android-icon-background.png",
        "monochromeImage": "./assets/images/android-icon-monochrome.png"
      },
      "edgeToEdgeEnabled": true,
      "predictiveBackGestureEnabled": false,
      "intentFilters": [
        {
          "action": "VIEW",
          "data": [
            {
              "scheme": "ukata.mobile",
              "host": "redirect"
            },
            {
              "scheme": "https",
              "host": "sso.ukata.io",
              "pathPrefix": "/auth/redirect"
            }
          ],
          "category": [
            "BROWSABLE",
            "DEFAULT"
          ]
        }
      ]
    },
    "web": {
      "output": "static",
      "favicon": "./assets/images/favicon.png"
    },
    "plugins": [
      "expo-router",
      [
        "expo-splash-screen",
        {
          "image": "./assets/images/splash-icon.png",
          "imageWidth": 200,
          "resizeMode": "contain",
          "backgroundColor": "#ffffff",
          "dark": {
            "backgroundColor": "#000000"
          }
        }
      ]
    ],
    "experiments": {
      "typedRoutes": true,
      "reactCompiler": true
    },
    "extra": {
      "router": {},
      "eas": {
        "projectId": "7c152890-76d9-4203-b3cf-771cf2e19066"
      }
    }
  }
}
As you can see, I configured my app’s scheme to ukata.mobile
Next step is configure your app deep link in keycloak as redirect URL.
Configure redirect url for Keycloak
Open the configuration page for your keycloak client and register the redirect url
In your keycloak client’s configuration, set the redirect url accordingly:
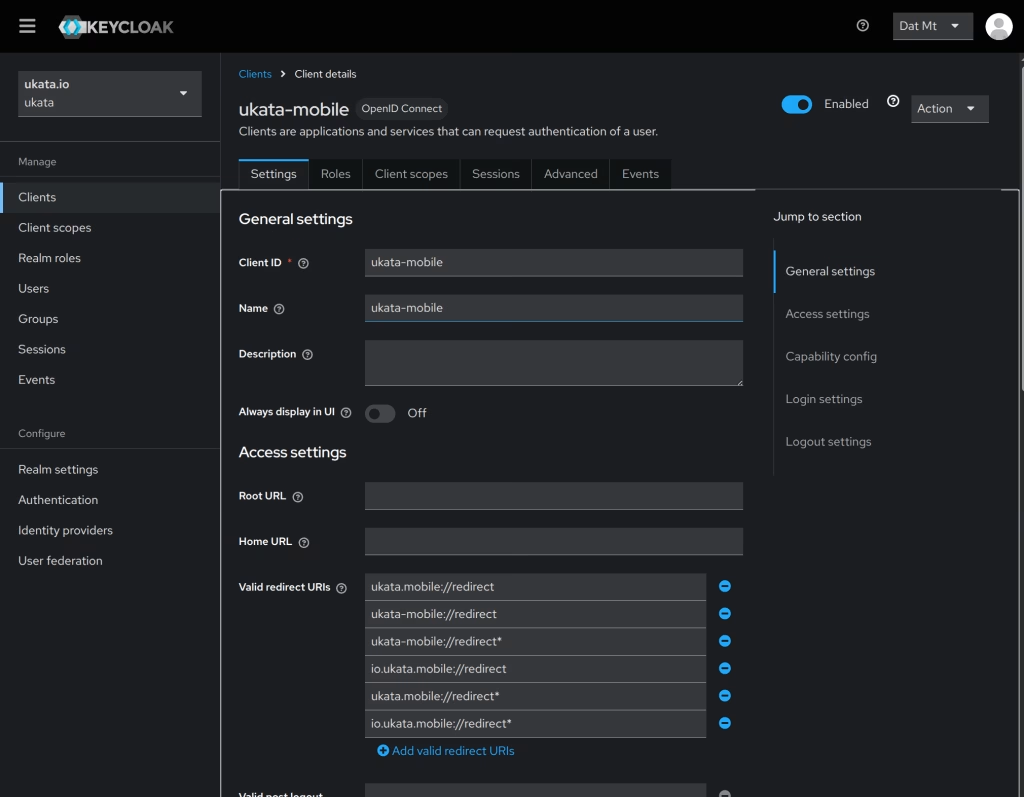
Here, I set a lot but in fact, you only need to set ukata.mobile://redirect and ukata.mobile://redirect* just to be sure
In the application, you also need to configure the redirect url so after the user login, that url is opened.
export const keycloakConfig: KeycloakConfig = {
  url: 'https://your-keycloak-server.com',
  realm: 'your-realm',
  clientId: 'your-client-id',
  redirectUri: 'ukata.mobile://redirect'
};
Create a development build and install on your mobile/emulator
After configuring all the steps above, you need to create a development build. Full guide is available here
If you are on android, the command is:
eas build --platform android --profile development
After installing the development build on your phone, you can try the login flow again. It should work.
Conclusion
In this post, I’ve shown you how to configure your expo app to login with keycloak. You need to configure the schema, redirect url and install the development build on your device.

I build softwares that solve problems. I also love writing/documenting things I learn/want to learn.