
Table of Contents
There are plenty of Apache Kafka Tutorials on the internet. Why another one?
While other tutorials are valuable, I see that improvement can be made. As a visual learner (yes, it’s a thing), I prefer tutorials with many videos and images.
Thus I created this one to help you quickly get started with Apache Kafa, see how it works, and start producing and consuming messages.
This post is the first part of an Apache Kafka tutorial series. As the first, it covers only the basic concepts. In-depth tutorials are reserved for later posts.
Code Repository
All the code in this tutorial is available at this GitHub repository: https://github.com/datmt/Kafka-Tutorials
Set up Apache Kafka using Docker
Previously, installing Kafka on VM is a serious task. Thanks to docker and docker-compose, setting up a cluster of Kafka brokers has never been easier.
The docker-compose.yaml file is under resources/deployment of the git repository above. However, here is the content of the docker-compose file:
version: '3'

services:
  zoo1:
    image: confluentinc/cp-zookeeper:7.2.1
    hostname: zoo1
    container_name: zoo1
    ports:
      - "2181:2181"
    environment:
      ZOOKEEPER_CLIENT_PORT: 2181
      ZOOKEEPER_SERVER_ID: 1
      ZOOKEEPER_SERVERS: zoo1:2888:3888;zoo2:2888:3888;zoo3:2888:3888

  zoo2:
    image: confluentinc/cp-zookeeper:7.2.1
    hostname: zoo2
    container_name: zoo2
    ports:
      - "2182:2182"
    environment:
      ZOOKEEPER_CLIENT_PORT: 2182
      ZOOKEEPER_SERVER_ID: 2
      ZOOKEEPER_SERVERS: zoo1:2888:3888;zoo2:2888:3888;zoo3:2888:3888

  zoo3:
    image: confluentinc/cp-zookeeper:7.2.1
    hostname: zoo3
    container_name: zoo3
    ports:
      - "2183:2183"
    environment:
      ZOOKEEPER_CLIENT_PORT: 2183
      ZOOKEEPER_SERVER_ID: 3
      ZOOKEEPER_SERVERS: zoo1:2888:3888;zoo2:2888:3888;zoo3:2888:3888


  kafka1:
    image: confluentinc/cp-kafka:7.2.1
    hostname: kafka1
    container_name: kafka1
    ports:
      - "9092:9092"
      - "29092:29092"
    environment:
      KAFKA_ADVERTISED_LISTENERS: INTERNAL://kafka1:19092,EXTERNAL://${DOCKER_HOST_IP:-127.0.0.1}:9092,DOCKER://host.docker.internal:29092
      KAFKA_LISTENER_SECURITY_PROTOCOL_MAP: INTERNAL:PLAINTEXT,EXTERNAL:PLAINTEXT,DOCKER:PLAINTEXT
      KAFKA_INTER_BROKER_LISTENER_NAME: INTERNAL
      KAFKA_ZOOKEEPER_CONNECT: "zoo1:2181,zoo2:2182,zoo3:2183"
      KAFKA_BROKER_ID: 1
      KAFKA_LOG4J_LOGGERS: "kafka.controller=INFO,kafka.producer.async.DefaultEventHandler=INFO,state.change.logger=INFO"
      KAFKA_AUTHORIZER_CLASS_NAME: kafka.security.authorizer.AclAuthorizer
      KAFKA_ALLOW_EVERYONE_IF_NO_ACL_FOUND: "true"
    depends_on:
      - zoo1
      - zoo2
      - zoo3

  kafka2:
    image: confluentinc/cp-kafka:7.2.1
    hostname: kafka2
    container_name: kafka2
    ports:
      - "9093:9093"
      - "29093:29093"
    environment:
      KAFKA_ADVERTISED_LISTENERS: INTERNAL://kafka2:19093,EXTERNAL://${DOCKER_HOST_IP:-127.0.0.1}:9093,DOCKER://host.docker.internal:29093
      KAFKA_LISTENER_SECURITY_PROTOCOL_MAP: INTERNAL:PLAINTEXT,EXTERNAL:PLAINTEXT,DOCKER:PLAINTEXT
      KAFKA_INTER_BROKER_LISTENER_NAME: INTERNAL
      KAFKA_ZOOKEEPER_CONNECT: "zoo1:2181,zoo2:2182,zoo3:2183"
      KAFKA_BROKER_ID: 2
      KAFKA_LOG4J_LOGGERS: "kafka.controller=INFO,kafka.producer.async.DefaultEventHandler=INFO,state.change.logger=INFO"
      KAFKA_AUTHORIZER_CLASS_NAME: kafka.security.authorizer.AclAuthorizer
      KAFKA_ALLOW_EVERYONE_IF_NO_ACL_FOUND: "true"
    depends_on:
      - zoo1
      - zoo2
      - zoo3

  kafka3:
    image: confluentinc/cp-kafka:7.2.1
    hostname: kafka3
    container_name: kafka3
    ports:
      - "9094:9094"
      - "29094:29094"
    environment:
      KAFKA_ADVERTISED_LISTENERS: INTERNAL://kafka3:19094,EXTERNAL://${DOCKER_HOST_IP:-127.0.0.1}:9094,DOCKER://host.docker.internal:29094
      KAFKA_LISTENER_SECURITY_PROTOCOL_MAP: INTERNAL:PLAINTEXT,EXTERNAL:PLAINTEXT,DOCKER:PLAINTEXT
      KAFKA_INTER_BROKER_LISTENER_NAME: INTERNAL
      KAFKA_ZOOKEEPER_CONNECT: "zoo1:2181,zoo2:2182,zoo3:2183"
      KAFKA_BROKER_ID: 3
      KAFKA_LOG4J_LOGGERS: "kafka.controller=INFO,kafka.producer.async.DefaultEventHandler=INFO,state.change.logger=INFO"
      KAFKA_AUTHORIZER_CLASS_NAME: kafka.security.authorizer.AclAuthorizer
      KAFKA_ALLOW_EVERYONE_IF_NO_ACL_FOUND: "true"
    depends_on:
      - zoo1
      - zoo2
      - zoo3

  kafka-schema-registry:
    image: confluentinc/cp-schema-registry:7.2.1
    hostname: kafka-schema-registry
    container_name: kafka-schema-registry
    depends_on:
      - zoo1
      - zoo2
      - zoo3
      - kafka1
      - kafka2
      - kafka3
    ports:
      - "8081:8081"
    environment:
      SCHEMA_REGISTRY_HOST_NAME: kafka-schema-registry
      SCHEMA_REGISTRY_KAFKASTORE_BOOTSTRAP_SERVERS: 'PLAINTEXT://kafka1:19092,PLAINTEXT://kafka2:19093,PLAINTEXT://kafka3:19094'
      SCHEMA_REGISTRY_LISTENERS: http://0.0.0.0:8081


  kafka-ui:
    image: provectuslabs/kafka-ui:052d8af45632265cc88192663b14fec5aff713f5
    container_name: kafka-ui
    depends_on:
      - kafka1
    ports:
      - "8080:8080"
    env_file:
      - ./env_file
Here is the environment file for Kafka-ui
KAFKA_CLUSTERS_0_BOOTSTRAPSERVERS=kafka1:29092
KAFKA_CLUSTERS_0_NAME=local_kafka
What does kafka-ui do? It provides a very nice interface for you to view the current status of the cluster. You don’t need to type queries in a shell console to see the current cluster’s status. Isn’t it cool?
Let’s talk a bit about the docker-compose.yaml file. From the beginning to line 100, it setups the cluster with 3 Kafka brokers and 3 zookeeper instances. I’m going to discuss more about these things later.
The schema registry is a standalone server outside of the Kafka cluster. It maintains the schemas have been written to the cluster’s topics. More on schema registry here: https://developer.confluent.io/learn-kafka/apache-kafka/schema-registry/
Let’s create the cluster by using docker-compose:
docker-compose up -d
Wait for a while for all the containers to start. Let’s check if we have all containers up and running correctly:
docker ps --format "table {{.ID}}\t{{.Image}}\t{{.Ports}}"The extra format is to show only columns I need (to avoid text span into multiple lines)
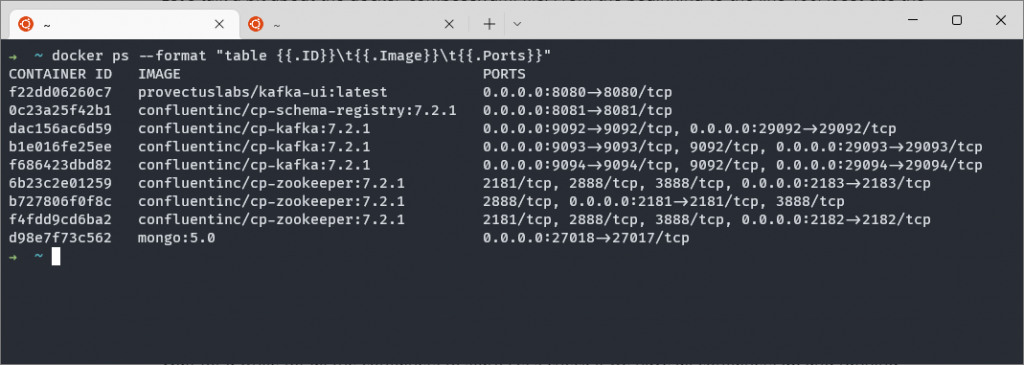
As you can see, all the containers are up.
Accessing Kafka UI
Now I have the Kafka GUI interface available (the first container exposed at port 8080 in the screenshot above. I can access it at http://localhost:8080
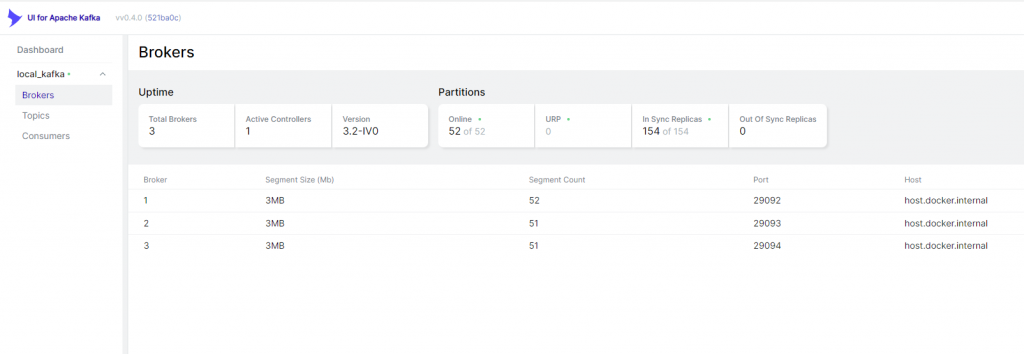
As you can see, Kafka UI has successfully connected to the cluster and displayed the number of brokers correctly.
Let’s start writing some code.
Create a Producer in Kafka
I’m going to use Java in this series. However, with the cluster up and running, you can use any programming language to connect to it.
public class StringProducer {
    public static void main(String[] args) {
       sendMessage();
    }


    private static void sendMessage() {
        Properties properties = new Properties();
        properties.put("bootstrap.servers", "localhost:9092");
        properties.put("key.serializer", "org.apache.kafka.common.serialization.StringSerializer");
        properties.put("value.serializer", "org.apache.kafka.common.serialization.StringSerializer");
        properties.put("schema.registry.url", "http://localhost:8081");

        try (Producer<String, String> producer = new KafkaProducer<>(properties)) {
            for (int i =0; i < 4; i++) {
                ProducerRecord<String, String> producerRecord =
                  new ProducerRecord<>(SIMPLE_STRING_TOPIC, "Message key: " + i, "Hello simple message" );
                producer.send(producerRecord);
            }
        }

    }
Let’s have a look at the most important points in the code above.
- In line 9, I specified the bootstrap servers. Though I started three brokers, I only need to specify one here. The client can discover the rest once it connects successfully to a broker.
- Line 10 and line 11 specify the serializer for the message’s key and value. Since I send only strings, I use StringSerializer
- Line 12 registers the schema registry (mentioned above)
- From line 14 to line 19, I send a message 4 times
Let’s run the code and check if I can see the messages in Kafka UI:
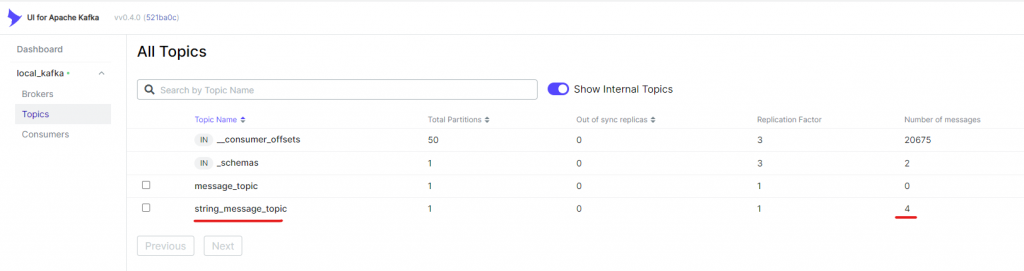
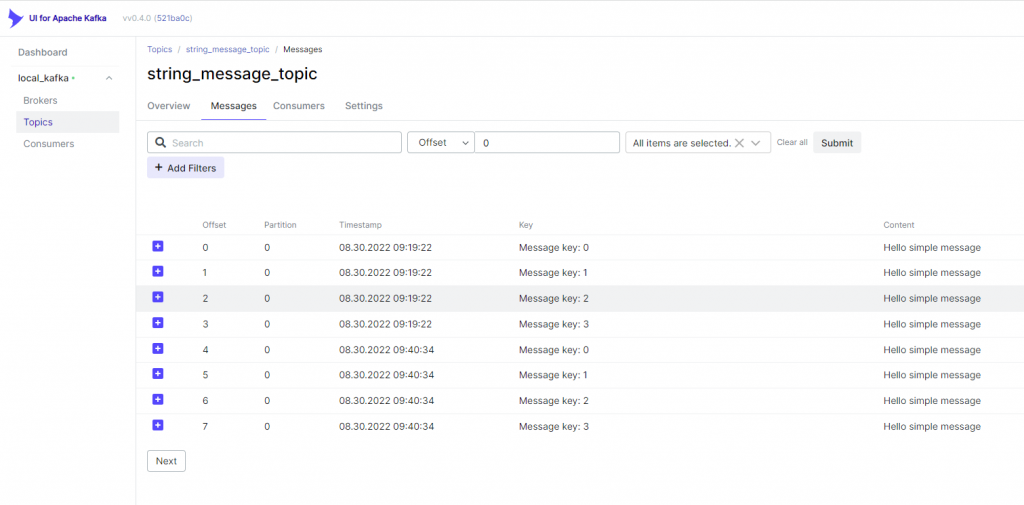
As you can see, a topic with the name string_message_topic was created and there are 4 messages. That means I have successfully executed the code and 4 messages was created in the cluster.
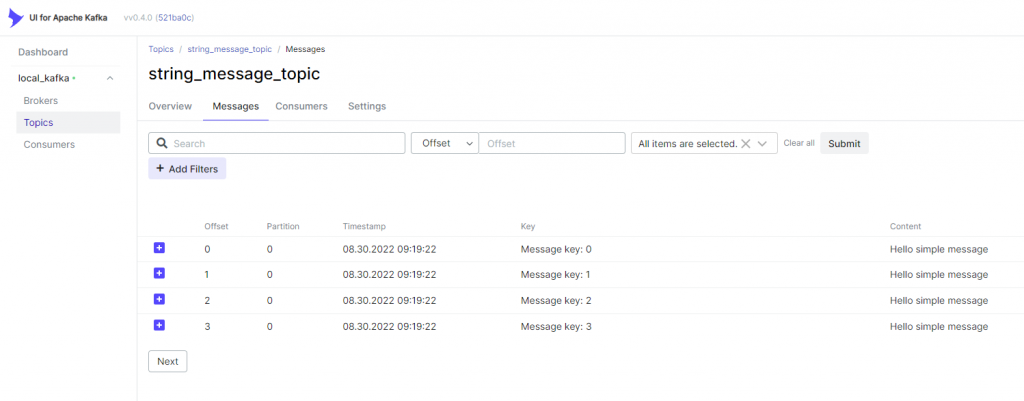
If I click on the topic and switch to the Messages tab, I can see the messages here:
Sending messages to the Kafka cluster is simple, isn’t it?
Consuming messages in Apache Kafka
Consuming messages in Kafka is as simple as producing them.
Let’s create a consumer to consume the messages:
    public static void main(String[] args) {
        consumeMessage();
    }

    private static void consumeMessage() {

        Properties properties = new Properties();

        properties.put("bootstrap.servers", "localhost:9092");
        properties.put("group.id", "kafka.simple_string_consumer");
        properties.put("key.deserializer", "org.apache.kafka.common.serialization.StringDeserializer");
        properties.put("value.deserializer", "org.apache.kafka.common.serialization.StringDeserializer");
        properties.put("schema.registry.url", "http://localhost:8081");

        try (KafkaConsumer<String,String> consumer = new KafkaConsumer<>(properties)) {
            consumer.subscribe(List.of(Constants.SIMPLE_STRING_TOPIC));
            while (true) {
                ConsumerRecords<String, String> messages = consumer.poll(Duration.ofSeconds(3));

                for (var message: messages) {
                    System.out.printf("Consuming message with key: %s and value: %s \n",message.key(),  message.value());
                }
            }
        }

    }
This code looks quite similar to that of I did with the producer. Let’s focus on the consuming message mechanism:
- On line 10, I specified a group id. This is important since consumers in Kafka must belong to a group. They don’t exist on their own. Even if the group has only one consumer, you still need to create a group and specify the group id for the consumer
- On line 15, I created a consumer with the properties
- On line 16, the consumer subscribes to a topic
- On line 18, the consumer polled the brokers to get the messages. Note that the timeout is the maximum time the consumer will wait for the messages. If messages are available, the method will return immediately.
- Line 20 to Line 22 display the messages if available.
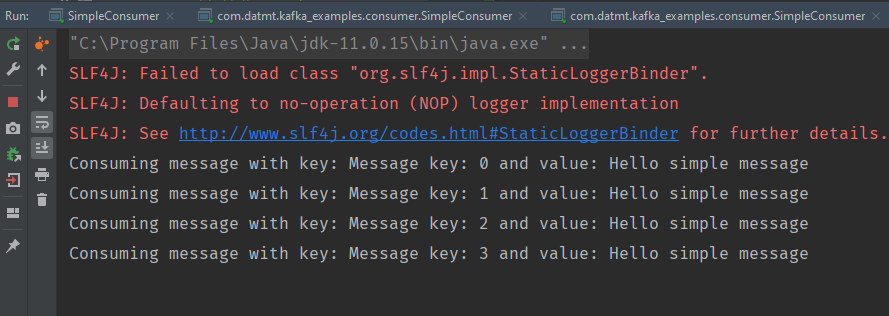
Now let’s run the consumer and see if we can get any messages:

You may wonder, why isn’t any message. I sent 4 messages before. By default, Kafka consumers only consume messages after the point it starts. If you want to consume previous messages, there are settings to be set.
To keep thing simple, let’s go back to the producer and run it again to produce new messages. When the producer runs, the messages appeared in the consumer console as expected:
If you go back to Kafa UI, you can see the are new messages available:
Conclusion
In this post, I’ve discussed how to set up Kafka clusters, Kafka UI and how to send/consume messages. The code for this post is available here:

I build softwares that solve problems. I also love writing/documenting things I learn/want to learn.