Table of Contents
Create an user
To create an user in Solr, first, you need to enable authentication plugin by creating a file named security.json under /var/solr/data.
Enter into your Solr environment (docker or command line where you have Solr installed) and execute the following command:
cat << EOF > /var/solr/data/security.json
{
"authentication":{
   "blockUnknown": true,
   "class":"solr.BasicAuthPlugin",
   "credentials":{"solr":"IV0EHq1OnNrj6gvRCwvFwTrZ1+z1oBbnQdiVC3otuq0= Ndd7LKvVBAaZIF0QAVi1ekCfAJXr1GGfLtRUXhgrF8c="},
   "forwardCredentials": false
},
"authorization":{
   "class":"solr.RuleBasedAuthorizationPlugin",
   "permissions":[{"name":"security-edit",
      "role":"admin"}],
    "user-role":{"solr":"admin"}
}
}
EOF
This command creates the security.json file at the correct location and also create an admin user with username solr and password SolrRocks.
Restart Solr (if you use docker, type docker restart your_solr_container).
Now, you have Solr authentication plugin enabled. You can use the user solr to create a new user.
curl --user solr:SolrRocks http://localhost:8983/solr/admin/authentication -H 'Content-type:application/json' -d '{"set-user": {"new_solr_user_name" : "strong_new_password" }}'After that, you should delete the user solr by delete all records related to this user in security.json file.
Here is the security.json file after a new user is created:
{
  "authentication":{
    "blockUnknown":true,
    "class":"solr.BasicAuthPlugin",
    "credentials":{
      "solr":"IV0EHq1OnNrj6gvRCwvFwTrZ1+z1oBbnQdiVC3otuq0= Ndd7LKvVBAaZIF0QAVi1ekCfAJXr1GGfLtRUXhgrF8c=",
      "new_solr_user_name":"H+x9i6Zy9U2sBQ9cDcAP/ddd IIpBHq7wyOQH2BnqSNYHeo4QL+lY4QSuaVmn5ma8lQI="},
    "forwardCredentials":false,
    "":{"v":0}},
  "authorization":{
    "class":"solr.RuleBasedAuthorizationPlugin",
    "permissions":[{
        "name":"security-edit",
        "role":"admin"}],
    "user-role":{"solr":"admin"}}
}
Now, delete solr under credential and replace solr with your new username at line 15.
The new content should look like this:
{
  "authentication":{
    "blockUnknown":true,
    "class":"solr.BasicAuthPlugin",
    "credentials":{
      "new_solr_user_name":"H+x9i6Zy9U2sBQ9cDcAP/ddd IIpBHq7wyOQH2BnqSNYHeo4QL+lY4QSuaVmn5ma8lQI="},
    "forwardCredentials":false,
    "":{"v":0}},
  "authorization":{
    "class":"solr.RuleBasedAuthorizationPlugin",
    "permissions":[{
        "name":"security-edit",
        "role":"admin"}],
    "user-role":{"new_solr_user_name":"admin"}}
}
Restart Solr and you now have a new instance with authentication plugin enabled with a secure login credentials.
Create a new collection/core
The best way to create a new core is from the command line, when you haven’t enabled the security plugin.
If you’ve already enabled the security plugin, you can set the authentication info in the command line using the follow commands:
export SOLR_AUTH_TYPE=basic
export SOLR_AUTHENTICATION_OPTS="-Dbasicauth=YOUR_USER:YOUR_PASS"
Creating is simple like this:
/opt/solr/bin/solr create -c core_name
Things will be a bit complicated when you have already enabled the security plugin. However, it’s not possbile.
The first thing is to create a folder with the same name as your core under /var/solr/data. For example, you want to create a core named my_new_core, folder /var/solr/data/my_new_core must be available.
Next, download this file:
and decompress into that folder above.
Now, you can create a new core with curl:
curl --user your_user:SomePW "http://localhost:8983/solr/admin/cores?action=CREATE&name=your_new_core_name"
Import data from SQL database
A common scenario for Solr user is to index data from database. You can use Solr client to do so. However, if you don’t have custom document schema, setting up a config file and use data import function would be a quicker choice.
First, create a file name db-data-config.xml under your core’s conf folder with the following content:
<dataConfig>

<dataSource type="JdbcDataSource"
           name="sentences"
           driver="org.postgresql.Driver"
           url="jdbc:postgresql://postgres:5432/pgsentences"
           user="db_user"
           password="db_pass"/>

       <document>
        <entity name="sentence" transformer="TemplateTransformer"
            dataSource="sentences"
            query="SELECT * FROM sentences"
            deltaImportQuery="SELECT * FROM scripts WHERE id>'${dih.delta.id}"
            >

            <field name="sentence" column="sentence" />
            <field name="word_count" column="word_count" />
        </entity>

       </document>
</dataConfig>
In the example above, I configure a connection to a PostgreSQL database.
I also defined a document with columns from the tables.
Save that file and in solrconfig.xml under the same folder, refer to this configuration as below:
 <requestHandler name="/dataimport" class="org.apache.solr.handler.dataimport.DataImportHandler">
    <lst name="defaults">
        <str name="config">db-data-config.xml</str>
    </lst>
</requestHandler>
If you connection to SQL databases, you may need to download your database’s driver so Solr can connect and index the data.
Also in solrconfig.xml
<lib dir="${solr.install.dir:../../../..}/dist/" regex="postgresql-.*\.jar" />As you can see, the driver jar file is placed under /opt/solr/dist
You also need to add other jar files into solrconfig.xml
	<lib dir="${solr.install.dir:../../../..}/dist/" regex="solr-dataimporthandler-.*\.jar" />
    <lib dir="${solr.install.dir:../../../..}/dist/" regex="mysql-connector-java-.*\.jar" />
    <lib dir="${solr.install.dir:../../../..}/dist/" regex="sqlite-jdbc-.*\.jar" />
    <lib dir="${solr.install.dir:../../../..}/dist/" regex="postgresql-.*\.jar" />

    <lib dir="${solr.install.dir:../../../..}/contrib/extraction/lib" regex=".*\.jar" />
    <lib dir="${solr.install.dir:../../../..}/dist/" regex="solr-cell-\d.*\.jar" />
    <lib dir="${solr.install.dir:../../../..}/contrib/clustering/lib/" regex=".*\.jar" />
    <lib dir="${solr.install.dir:../../../..}/dist/" regex="solr-clustering-\d.*\.jar" />
    <lib dir="${solr.install.dir:../../../..}/contrib/langid/lib/" regex=".*\.jar" />
    <lib dir="${solr.install.dir:../../../..}/dist/" regex="solr-langid-\d.*\.jar" />
Up to this point, you can restart Solr and have the database indexed. However, the result may not what you expected. You also need to define the document schema in managed-schema file.
Here, you define each field of the document. Here is an example:
    <field name="id" type="string" indexed="true" stored="true" required="true" multiValued="false" />
    <field name="word_count" type="plong" indexed="true" stored="true" multiValued="false" />
    <field name="correction_script" type="string" indexed="true" stored="true" multiValued="false" />
    <field name="speech_analyzed" type="string" indexed="true" stored="true" multiValued="false" />
    <field name="file_name" type="string" indexed="true" stored="true" required="true" multiValued="false" />
    <!-- docValues are enabled by default for long type so we don't need to index the version field  -->
    <field name="_version_" type="plong" indexed="false" stored="false"/>
Make sure the field’s names here match the fields you described in db-data-config.xml
Also, if your field could be null, you must not set required attribute.
Now, restart solr and you are ready to import.
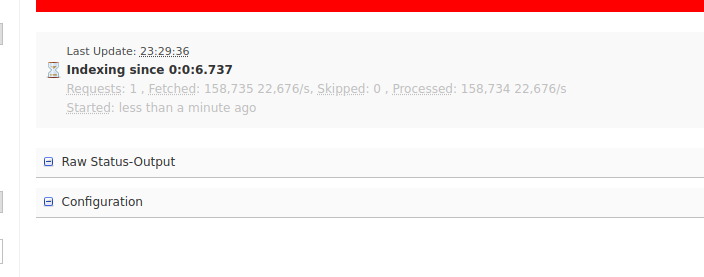
Select the core, go to dataimport and click on Execute. You should see something like this:
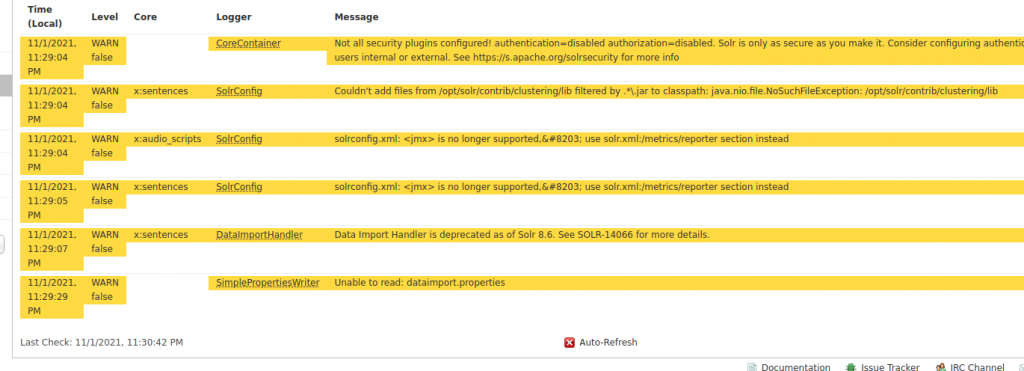
If the process stops instantly, there could be something wrong. You may need to check the Log area for more details:
If you have a lot of data (like me), it make take a while to completely index your database.
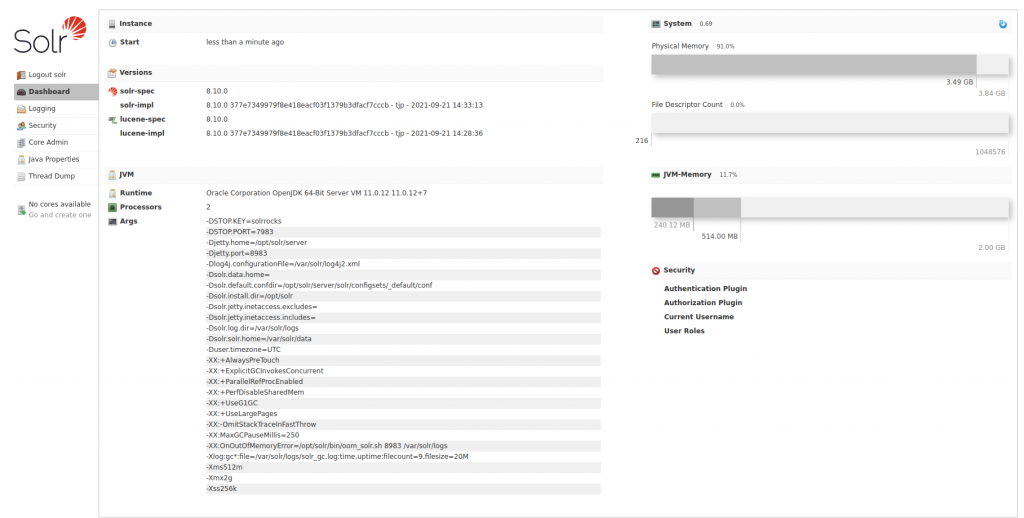
Increase max memory for Solr
Initially, Solr set 512MB for heap memory. For small data, that would be enough. However, there are times you notice that your Solr instance keeps shutting down because of lack of memory.
That’s the time you need to increase Solr’s memory.
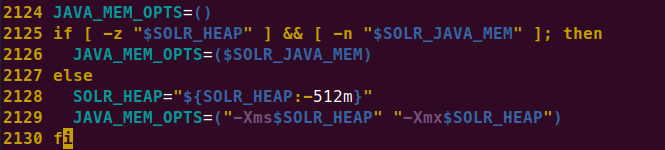
Increasing memory for Solr is quite simple. Simply only the file /opt/solr/bin/solr in a text editor and find the block where Solr set the memories (you can search for the 512 value).
The original block looks like this:
Then edit like this:
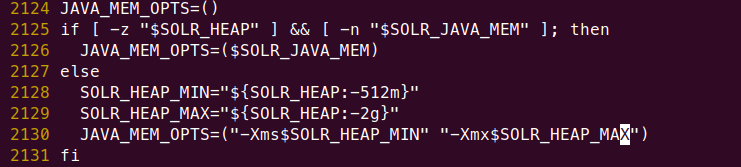
In the screenshot, you can see that I changed the max value to 2G.
I’ve copied the text here for your convenience:
JAVA_MEM_OPTS=()
if [ -z "$SOLR_HEAP" ] && [ -n "$SOLR_JAVA_MEM" ]; then
  JAVA_MEM_OPTS=($SOLR_JAVA_MEM)
else
  SOLR_HEAP_MIN="${SOLR_HEAP:-512m}"
  SOLR_HEAP_MAX="${SOLR_HEAP:-3g}"
  JAVA_MEM_OPTS=("-Xms$SOLR_HEAP_MIN" "-Xmx$SOLR_HEAP_MAX")
fi
Save and restart solr and you should see the changes updated:

I build softwares that solve problems. I also love writing/documenting things I learn/want to learn.