Table of Contents
Recently I had to set up a WordPress development environment with Docker. My setup is very simple with one MariaDB image with one WordPress image. Here is the part of the docker-compose.yaml file containing these two services:
  wp_main:
    container_name: wp_main
    image: wordpress
    restart: always
    volumes:
      - ./wp_main/wp-content:/var/www/html/wp-content
      - ./wp_main/wp-config.php:/var/www/html/wp-config.php
    environment:
      WORDPRESS_DB_HOST: db_main
      WORDPRESS_DB_USER: root
      WORDPRESS_DB_PASSWORD: root
      WORDPRESS_DB_NAME: wp
  db_main:
    image: mariadb:10.5.9
    restart: always
    container_name: db_main
    volumes:
      - db_main:/var/lib/mysql
    environment:
      MYSQL_ROOT_PASSWORD: root
Very straight forward, right?
But I noticed that it strangely slow when connecting to this local site. I tried disabling DNS lookup but got no improvement.
Until I did a simple trick.
What I did to improve my local WordPress site 1000x times
Well, 1000x seems to be an overstatement but got the site loading from 17s to literally milliseconds, that’s a lot for me.
Long story short, I suspected that the connection to the DB took the lion share of the loading time. So, instead of letting the docker networking handling the name resolution, I mapped the IP of the DB instance directly in the WordPress container.
That’s all I did.
If you now know what to do, good. Leave this site and implement the changes immediately. You should see a huge improvement with the loading time.
If you still need the instructions, read on.
Step by step to improve local WordPress development loading time.
Step one: Find your db IP
It’s quite simple to find the DB’s IP. First, you need to locate the database container with the help of docker ps:

As you can see from the image, the database container in my case is db_main. Next, do a docker inspect to find the container’s IP:
docker inspect <container_name>
# In my case, that would be docker inspect db_main
You will get a lot of text. However, you only need to pay attention to the last part, where the Networks block resides:
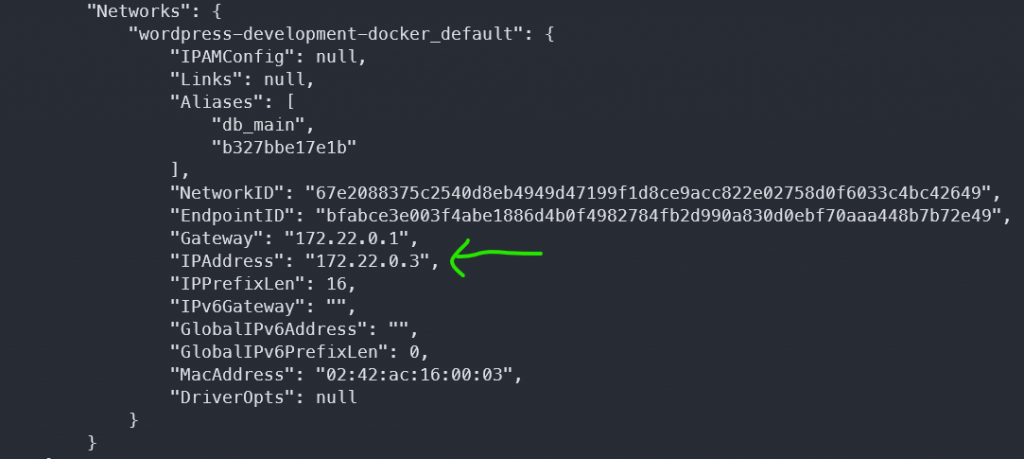
172.22.0.3 is the IP I need.
Let’s put this valuable info to the WordPress container.
Step 2: Put the IP of the DB in WordPress container
Now, let’s bash into the WordPress container:
docker exec -it <container_name> bash

# In my case, that would be wp_main
Now, let’s update the /etc/hosts file with the db name and its IP
echo "172.22.0.3 db_main" >> /etc/hosts
Now, the /etc/hosts file contains the IP of the db_host. It will not have to ask the DNS to find the IP. The improvement is night and day.
What have I done?
As you can see first in the docker-compose.yaml file, I pointed hostname to db_main. When WordPress saw that as the db host, it asked the DNS to find the IP for that host name.
By setting the IP of the hostname right in the /etc/hosts file, the DNS stopped after finding the IP in that file. Thus, no more wasting time on upper DNS levels.
Give it a try, I promise you will see a big improvement.

I build softwares that solve problems. I also love writing/documenting things I learn/want to learn.