Table of Contents
Overview
In this post, I’m going to quickly show you how to configure data sources in Spring applications. If you are most familiar with Spring Boot, you may already know how to configure a single data source with applications.properties (or application.yaml). Since I’m not using Spring Boot, I’ll show you how to create a DataSource bean.
Let’s get started.
Example setup
Before working on the configuration, let’s create a database instance. I prefer to use Docker to quickly start a PostgreSQL instance. You can use other databases or methods if you prefer.
I prepared a docker compose file for PostgreSQL container here.
version: '3.8'

services:
  postgres:
    container_name: postgres_db
    image: postgres:13.6-alpine
    env_file: ./pg.env
    volumes:
       - postgres:/data/postgres
    ports:
      - "5433:5432"
    networks:
      - postgres
    restart: always

  pgadmin:
    container_name: pgadmin
    image: dpage/pgadmin4:6.2
    env_file: ./pg.env
    volumes:
       - pgadmin:/var/lib/pgadmin
    ports:
      - "38081:80"
    networks:
      - postgres
    restart: always

networks:
  postgres:
    driver: bridge

volumes:
    postgres:
    pgadmin:
This docker compose file refers to another file called pg.env. Here is the content of that file:
POSTGRES_PASSWORD=root
POSTGRES_USER=root
POSTGRES_DB=db1
[email protected]
PGADMIN_DEFAULT_PASSWORD=root
PGADMIN_CONFIG_SERVER_MODE=False
As you can see, with this setup, you can access PostgreSQL with pgadmin. The default database is db1 (line 4 of the pg.env file) and the username/password are root.
You can start the who thing with this command
docker-compose up
Configure Maven dependencies
Since I’m not using Spring Initializer, I need to configure the pom.xml manually. This is the configuration for this series:
<?xml version="1.0" encoding="UTF-8"?>
<project xmlns="http://maven.apache.org/POM/4.0.0" xmlns:xsi="http://www.w3.org/2001/XMLSchema-instance"
         xsi:schemaLocation="http://maven.apache.org/POM/4.0.0 https://maven.apache.org/xsd/maven-4.0.0.xsd">
    <modelVersion>4.0.0</modelVersion>

    <groupId>com.datmt.springdata</groupId>
    <artifactId>spring-data-jpa-transactional</artifactId>
    <version>0.0.1-SNAPSHOT</version>
    <name>spring-data-jpa-transactional</name>
    <description>spring-data-jpa-transactional</description>
    <properties>
        <java.version>17</java.version>
        <spring.version>5.3.23</spring.version>
        <lombok.version>1.18.24</lombok.version>
        <postgresql.version>42.5.0</postgresql.version>
        <maven.compiler.source>17</maven.compiler.source>
        <maven.compiler.target>17</maven.compiler.target>
    </properties>
    <dependencies>

        <dependency>
            <groupId>org.springframework</groupId>
            <artifactId>spring-context</artifactId>
            <version>${spring.version}</version>
        </dependency>

        <dependency>
            <groupId>org.springframework</groupId>
            <artifactId>spring-jdbc</artifactId>
            <version>${spring.version}</version>
        </dependency>

        <dependency>
            <groupId>org.projectlombok</groupId>
            <artifactId>lombok</artifactId>
            <version>${lombok.version}</version>
        </dependency>
        <dependency>
            <groupId>org.postgresql</groupId>
            <artifactId>postgresql</artifactId>
            <version>${postgresql.version}</version>
        </dependency>
    </dependencies>


    <build>
        <plugins>
            <plugin>
                <groupId>org.apache.maven.plugins</groupId>
                <artifactId>maven-compiler-plugin</artifactId>
                <version>3.10.1</version>
            </plugin>
        </plugins>
    </build>
</project>
That’s all you need in the pom.xml.
Let’s create the configuration bean to inject the data source.
package com.datmt.springdata.springdatajpatransactional.config;

import org.springframework.context.annotation.Bean;
import org.springframework.context.annotation.Configuration;
import org.springframework.jdbc.datasource.DriverManagerDataSource;

import javax.sql.DataSource;

@Configuration
public class AppConfig {

    @Bean(name = "default_datasource")
    DataSource dataSource() {
        DriverManagerDataSource dataSource = new DriverManagerDataSource();
        dataSource.setDriverClassName(org.postgresql.Driver.class.getName());
        dataSource.setUrl("jdbc:postgresql://localhost:5433/db1");
        dataSource.setUsername("root");
        dataSource.setPassword("root");
        return dataSource;
    }
}
As you can see, it’s quite simple to create a bean. I also gave the bean a custom name to show you that is possible.
Let’s create a main class to check you the DataSource bean is successfully configured:
package com.datmt.springdata.springdatajpatransactional;


import com.datmt.springdata.springdatajpatransactional.config.AppConfig;
import org.springframework.context.annotation.AnnotationConfigApplicationContext;

public class SpringDataJpaTransactionalApplication {

    public static void main(String[] args) {

        var appContext = new AnnotationConfigApplicationContext(AppConfig.class);
        var datasourceBean = appContext.getBean("default_datasource");


    }

}
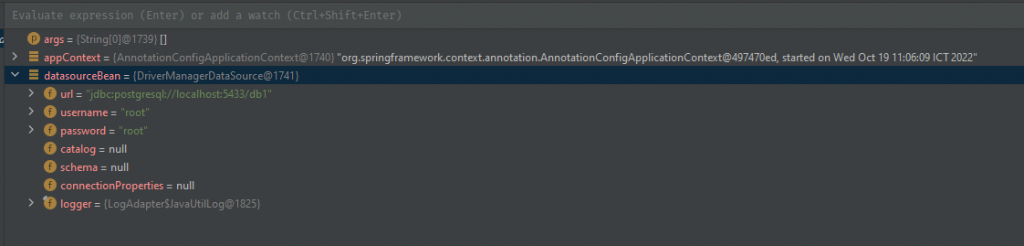
Set a breakpoint at line 17 and run the app in debug mode. You should see the data source bean is successfully configured:
Conclusion
In this post, I’ve shown you how to quickly set up a PostgreSQL instance using Docker and then configure a Spring application to connect to that instance using a DataSource bean.
This setup is what I’m going to use for the rest of the mini-series.

I build softwares that solve problems. I also love writing/documenting things I learn/want to learn.