Table of Contents
Introduction
As applications grow in complexity and scale, traditional file-based logging can become difficult to manage and analyze.
Logging to an external source offers a scalable, queryable, and centralized logging solution. This approach enables better log data analysis and aggregation, providing insights into application performance and helping quickly diagnose issues.
In this post, I will show you how to add a custom log appender and write your log data to a MongoDB database. Whether you should do this depends on your specific use cases. However, with the same approach, you can add logs to any external database/repo you want.
Let’s get started.
Why MongoDB for Logging?
MongoDB, a popular NoSQL database, is well-suited for logging due to its schema-less nature, scalability, and flexible querying capabilities. Storing logs in MongoDB allows developers to easily search, aggregate, and analyze log data without the limitations of file-based storage.
Configuring Spring Boot for MongoDB Logging
To log from a Spring Boot application to MongoDB, we’ll use a custom log appender that leverages the Spring Data MongoDB framework for seamless MongoDB integration.
Adding dependencies
Gradle:
implementation group: 'org.springframework.data', name: 'spring-data-mongodb', version: '4.2.2'
Maven:
<!-- https://mvnrepository.com/artifact/org.springframework.data/spring-data-mongodb -->
<dependency>
    <groupId>org.springframework.data</groupId>
    <artifactId>spring-data-mongodb</artifactId>
    <version>4.2.2</version>
</dependency>
Configure logback.xml
Now, let’s declare a new logback appender in logback.xml
<?xml version="1.0" encoding="UTF-8"?>
<configuration debug="true" scan="true" scanPeriod="30 seconds">

   <root level="INFO">
        <appender-ref ref="STDOUT"/>
        <appender-ref ref="FILE"/>
        <appender-ref ref="MONGO"/>
    </root>
    <appender name="MONGO" class="com.datmt.logging.config.MongoLogAppender">
        <encoder>
            <pattern>%d{yyyy-MM-dd HH:mm:ss} - %logger{36} - %level - %msg%n</pattern>
        </encoder>
        <connectionString>mongodb://mongo99:mongo99@localhost:27017</connectionString>
        <databaseName>log</databaseName>
        <collectionName>logCollection</collectionName>
    </appender>


</configuration>
Here, I put the connection string with credentials in the XML file. In your production environment, make sure you put sensitive info in environment variables.
On line 9, the class com.datmt.logging.config.MongoLogAppender contains the logic that write data to the MongoDB database.
Write log to MongoDB database
To create a custom appender, you create a class and extend the AppenderBase class.
package com.datmt.logging.config;

import org.bson.Document;
import org.springframework.stereotype.Component;

import com.mongodb.client.MongoClients;
import com.mongodb.client.MongoCollection;
import com.mongodb.client.MongoDatabase;

import ch.qos.logback.classic.spi.ILoggingEvent;
import ch.qos.logback.core.AppenderBase;
import lombok.extern.slf4j.Slf4j;

@Component
@Slf4j
public class MongoLogAppender extends AppenderBase<ILoggingEvent> {

private String connectionString;
    private String databaseName;
    private String collectionName;
    private MongoCollection<org.bson.Document> collection;

    public void setConnectionString(String connectionString) {
        this.connectionString = connectionString;
    }

    public void setDatabaseName(String databaseName) {
        this.databaseName = databaseName;
    }

    public void setCollectionName(String collectionName) {
        this.collectionName = collectionName;
    }

    @Override
    public void start() {
        super.start();
        try {
            var mongoClient = MongoClients.create(connectionString);
            MongoDatabase database = mongoClient.getDatabase(databaseName);
            collection = database.getCollection(collectionName);
        } catch (Exception e) {
            addError("Error connecting to MongoDB", e);
        }
    }

    @Override
    protected void append(ILoggingEvent eventObject) {
        if (collection != null) {
            Document log = new Document("level", eventObject.getLevel().toString())
                    .append("logger", eventObject.getLoggerName())
                    .append("message", eventObject.getFormattedMessage())
                    .append("timestamp", eventObject.getTimeStamp());
            collection.insertOne(log);
        }
    }


}
You notice that there are fields related to MongoDB connection. These are the ones I set in the logback.xml.
You might be surprised, this is all you need to configure to send your log to a MongoDB database.
Let’s run and see how it works.
Send logs to MongoDB
Let’s modify the TestLogService:
	@Component
	public static class TestLogService {
		public TestLogService() {
			while (true) {
				var order = new Order();
				order.setOrderId("123");
				order.setCustomerName("John");
				order.setOrderDate("2020-01-01");
				log.info("{}", order);
				try {
					Thread.sleep(1000);
				} catch (InterruptedException e) {
					e.printStackTrace();
				}
			}
		}
	}
Here, I log an object every 1 seconds.
When I run the application, logs printed out normally:

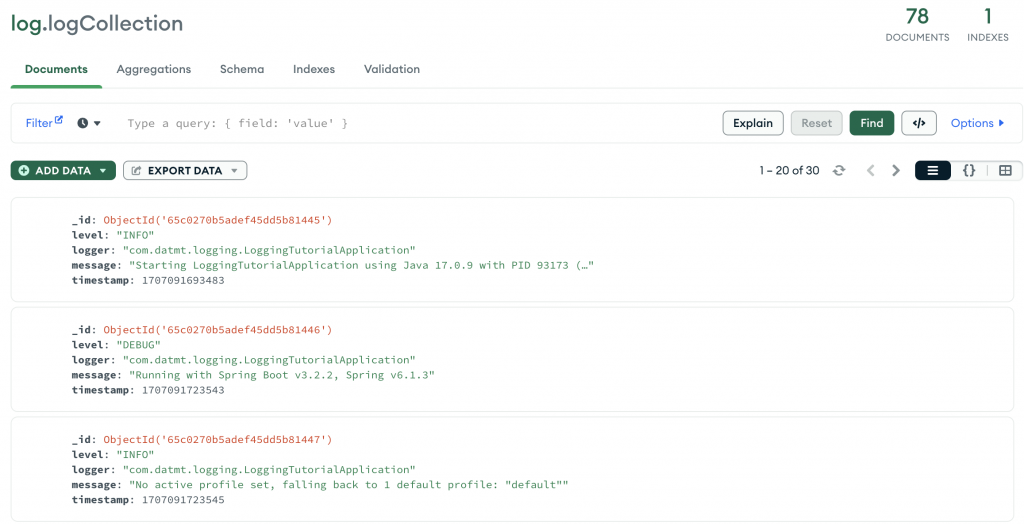
If I check the database, I can see logs are saved as documents:
Benefits and Considerations
Logging to MongoDB with Spring Boot provides a powerful, flexible approach to log management. However, consider the impact on your MongoDB cluster’s performance and ensure it’s appropriately scaled and monitored to handle the volume of log data produced by your application.
Conclusion
Integrating MongoDB for logging in Spring Boot applications offers a modern solution to centralized log management, enhancing the ability to analyze and act upon log data. By following the steps outlined above, developers can leverage MongoDB’s strengths for scalable, efficient logging practices.

I build softwares that solve problems. I also love writing/documenting things I learn/want to learn.