Jakarta Servlets Quick Start Tutorial

Overview
This Jakarta Servlets Quick Start tutorial will help you learn the basics of Jakarta Servlet (previously known as Java Servlet).
This is not an in-depth tutorial. The purpose of this post is to quickly help you get started building web applications with Jakarta servlet technology.
After this tutorial, you will understand:
- What is a Servlet?
- How to handle HTTP requests with Jakarta Servlets?
- How to deploy a web project with Jakarta Servlets?
- How to manage sessions, and cookies in Jakarta servlets?
What is Jakarta Servlets?
Jakarta Servlets (formerly Java Servlets) is a technology created by Sun Microsystems to build dynamic web applications.
It is the of all Java EE applications. Technologies such as Jakarta Server Pages (JSP), and Jakarta Server Faces (JSF)… all use Jakarta Servlets under the hood.
What is a Servlet?
A servlet is a Java class that handles requests forwarded by the Servlet container. Application developers write servlets to handle HTTP requests, for example.
To register a servlet, developers can either use the web.xml file or the annotation @WebServlet
The Servlet Container
As mentioned earlier, servlets don’t directly handle requests. The application servers (such as glassfish/payara or WildFly) play the role of servlet containers. Servlet containers are responsible for managing servlets including forwarding requests, handling lifecycle…
Jakarta Servlet lifecycle
A servlet is managed by the servlet container. Thus, servlets’ lifecycle is also managed by the container.
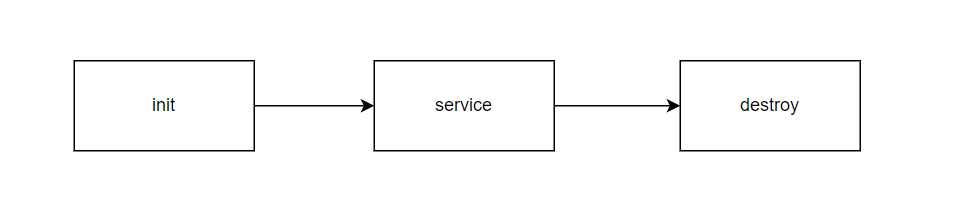
Three stages in a servlet’s lifecycle
The init method
After the servlet container creates the servlet instance, the init method is called (by the servlet container). Before the servlet can handle any request, this method must complete successfully.
The service method
This method is also called by the servlet container to handle incoming requests.
The destroy method
The servlet container calls this method to signify that the servlet is no longer accepting requests. It is called when:
- A timeout has passed
- All threads within the service method exit
Servlet lifecycle in action
Consider the following servlet:
public class LifecycleServlet extends HttpServlet {
private static final long serialVersionUID = 1L;
public void init() {
System.out.println("HelloServlet on init");
}
protected void doGet(HttpServletRequest request, HttpServletResponse response) throws ServletException, IOException {
System.out.println("HelloServlet on GET request");
response.getWriter().append("Handling in LifecycleServlet");
}
public void destroy() {
System.out.println("HelloServlet on destroy");
}
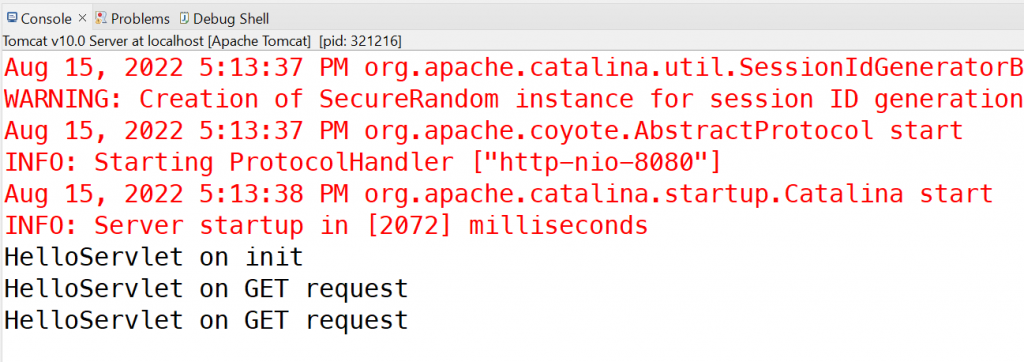
}Once there is a request coming in (users visit from the URL, for example), the init method is called. Then, the service is called:
Servlet init and service
If I put a breakpoint at line 13 and look at the call stack, I can see the service method calls doGet:
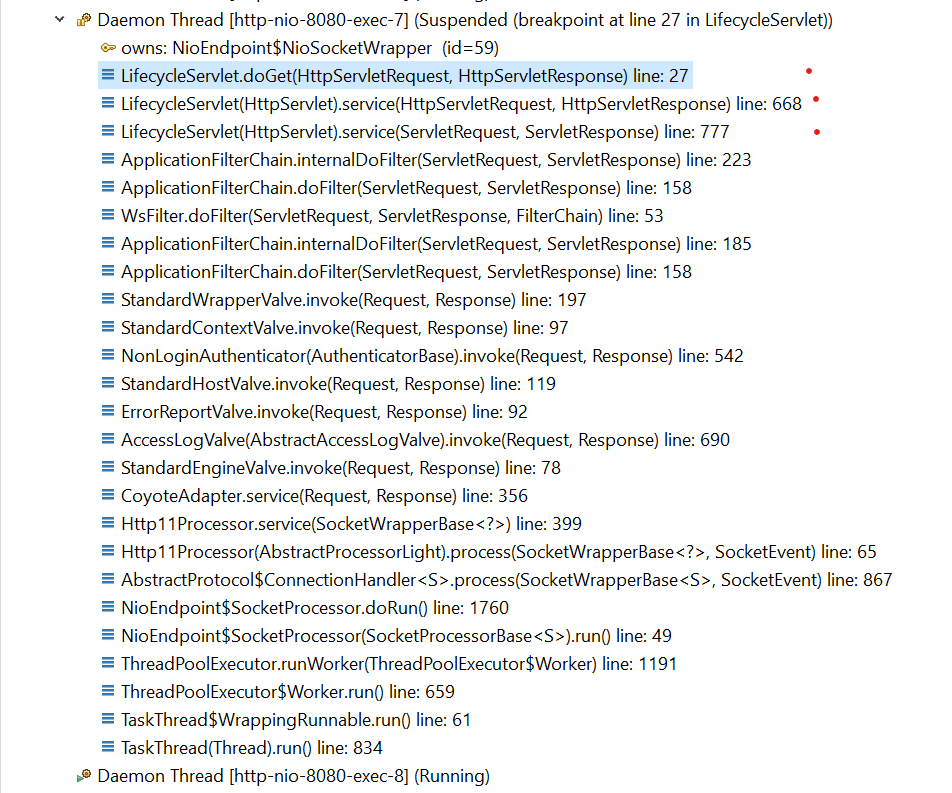
Servlet service stack trace
The service method in HttpServlet class checks the request method (POST/GET/HEAD…) and call doPost/doGet/doHead… respectively.
If I reload the browser multiple times, the doGet method is called multiple times:
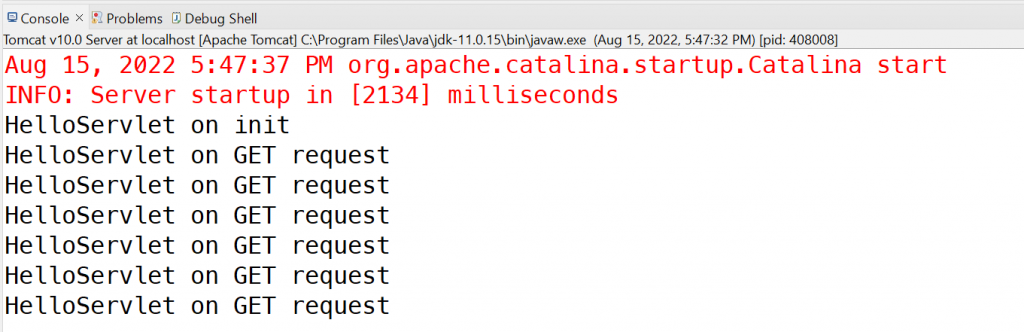
Calling service multiple times
However, the init method was called only once.
The destroy method, as mentioned above is called when all threads within the service method exit or the timeout period have passed (default is 30 minutes).
You can stop the server to force all threads to exit to see the destroy method is called:
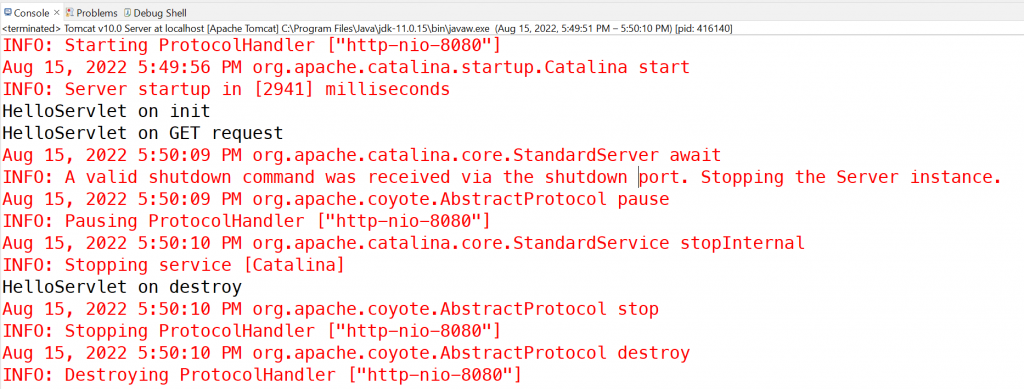
Servlet’s destroy method is called
Servlet sample application
The above code and the rest of this tutorial code is available here.
We are going to develop an example application that cover the basic concepts of Jakarta servlets.
Create and register a new servlet
To create and register a new servlet, you need first to create the servlet class. For example, I’m going to create a servlet called SimpleServlet.
This is the class file:
package com.datmt.servlet;

import java.io.IOException;

import jakarta.servlet.ServletException;
import jakarta.servlet.http.HttpServlet;
import jakarta.servlet.http.HttpServletRequest;
import jakarta.servlet.http.HttpServletResponse;

public class SimpleServlet extends HttpServlet {

	@Override
	protected void doGet(HttpServletRequest req, HttpServletResponse resp) throws ServletException, IOException {

		resp.getWriter().append("Hello from SimpleServlet");

	}

}
This servlet handles HTTP requests, thus I need to extend the HttpServlet class.
In addition, I intend to let it serve only GET requests. Thus, I overriden the doGet method to output a simple text to the browser.
However, this is not enough. I also need to either:
- Annotate the class with @WebServlet or
- Register the servlet in the web.xml file
For simplicity, I use the annotation:
package com.datmt.servlet;

import java.io.IOException;

import jakarta.servlet.ServletException;
import jakarta.servlet.annotation.WebServlet;
import jakarta.servlet.http.HttpServlet;
import jakarta.servlet.http.HttpServletRequest;
import jakarta.servlet.http.HttpServletResponse;

@WebServlet("/simple-servlet")
public class SimpleServlet extends HttpServlet {

	private static final long serialVersionUID = 1L;

	@Override
	protected void doGet(HttpServletRequest req, HttpServletResponse resp) throws ServletException, IOException {

		resp.getWriter().append("Hello from SimpleServlet");

	}

}
Now, I rebuild the project and deploy it again on my Tomcat server, I can access the URL to see the text display on my browser:
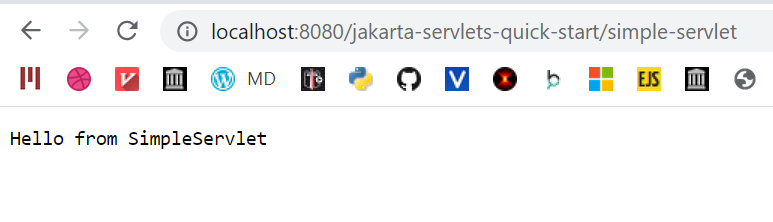
Display simple output to browser using servlet
Display JSON output
By default, the content type of the response is text/html. If you want to output JSON content, you need to set the content type to “application/json”:
package com.datmt.servlet;

import java.io.IOException;

import jakarta.servlet.ServletException;
import jakarta.servlet.annotation.WebServlet;
import jakarta.servlet.http.HttpServlet;
import jakarta.servlet.http.HttpServletRequest;
import jakarta.servlet.http.HttpServletResponse;

@WebServlet("/simple-json-servlet")
public class SimpleJSONServlet extends HttpServlet {

	private static final long serialVersionUID = 1L;

	@Override
	protected void doGet(HttpServletRequest req, HttpServletResponse resp) throws ServletException, IOException {

		resp.setContentType("application/json");
		resp.getWriter().append("{\"type\": \"JSON\"}");

	}

}
This servlet simply write a JSON object. When I access the servlet from my browser, surely I get JSON content:
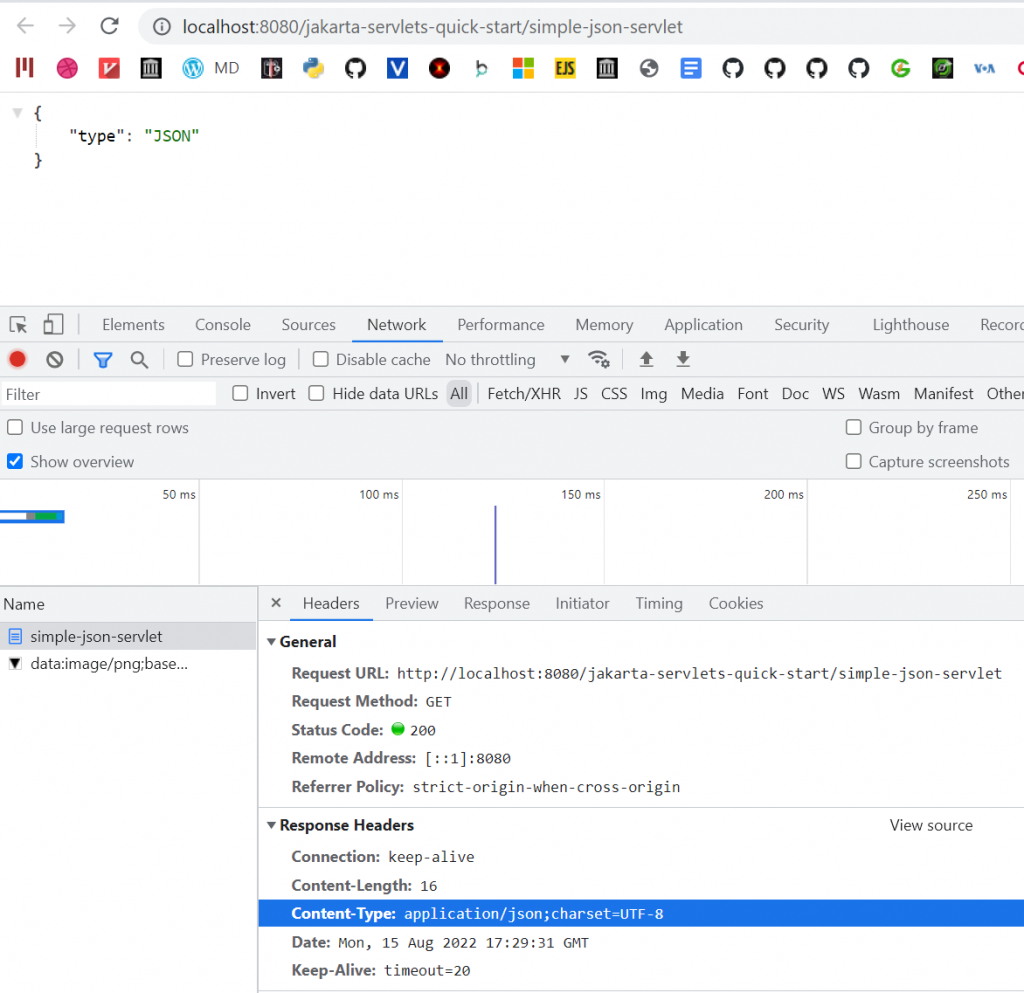
Output JSON content type with servlet
Form handling
User input handling
When building applications, accepting users’ input is one of the most common tasks. Let’s learn how to get and process users’ input.
I’m going to create one servlet to show you how to get GET and POST parameters. Other methods would have the same mechanism.
package com.datmt.servlet;

import java.io.IOException;
import java.util.Map;

import jakarta.servlet.ServletException;
import jakarta.servlet.annotation.WebServlet;
import jakarta.servlet.http.HttpServlet;
import jakarta.servlet.http.HttpServletRequest;
import jakarta.servlet.http.HttpServletResponse;

@WebServlet("/handling-user-input-servlet")
public class HandlingUserInputServlet extends HttpServlet {

	private static final long serialVersionUID = 1L;

	@Override
	protected void doGet(HttpServletRequest req, HttpServletResponse resp) throws ServletException, IOException {

		Map<String, String[]> params = req.getParameterMap();

		System.out.println("Print GET parameters");

		for (String key : params.keySet()) {
			System.out.println(key + " => " + String.join(", ", params.get(key)));
		}

	}

	@Override
	protected void doPost(HttpServletRequest req, HttpServletResponse resp) throws ServletException, IOException {

		Map<String, String[]> params = req.getParameterMap();
		System.out.println("Print POST parameters");

		for (String key : params.keySet()) {
			System.out.println(key + " => " + String.join(", ", params.get(key)));
		}
	}

}
As you can see, the servlet has two methods to handle POST and GET requests. They both print the GET and POST parameters out in the console.
Let’s build the project and visit the URL and set some URL parameters:

Setting GET parameters
Sure enough, the values are displayed in the console:
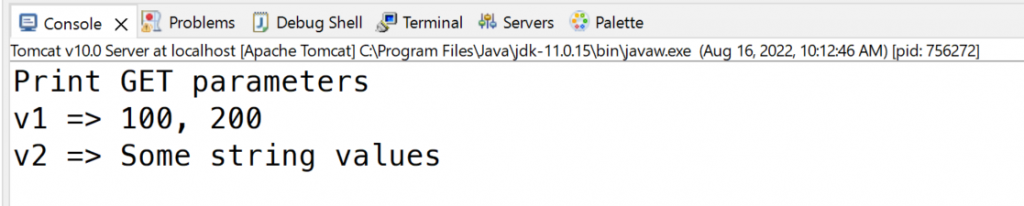
Getting GET parameters
To send POST requests, you can either use CURL or Postman. I’ll leave this task for you :).
Cookies Handling
HTTP Cookies are small data that the server sends to the browsers. The browsers can store that cookie and send it back to the server in subsequent requests.
More information about cookies here
Let’s try setting and getting cookies in servlet.
Set cookies
I’m going to create this class to set cookies. The code is quite simple. Every time a user visits that URL, a cookie named “some_cookie” is set to a random UUID value:
package com.datmt.servlet;

import java.io.IOException;
import java.util.UUID;

import jakarta.servlet.ServletException;
import jakarta.servlet.annotation.WebServlet;
import jakarta.servlet.http.Cookie;
import jakarta.servlet.http.HttpServlet;
import jakarta.servlet.http.HttpServletRequest;
import jakarta.servlet.http.HttpServletResponse;

@WebServlet("/set-cookie-servlet")
public class SetCookieServlet extends HttpServlet {

	private static final long serialVersionUID = 1L;

	@Override
	protected void doGet(HttpServletRequest req, HttpServletResponse resp) throws ServletException, IOException {

		Cookie cookie = new Cookie("some_cookie", UUID.randomUUID().toString());
		resp.addCookie(cookie);

		resp.getWriter().append("Cookie is set!");
	}

}
Let’s create another servlet to display the cookie’s value:
package com.datmt.servlet;

import java.io.IOException;

import jakarta.servlet.ServletException;
import jakarta.servlet.annotation.WebServlet;
import jakarta.servlet.http.Cookie;
import jakarta.servlet.http.HttpServlet;
import jakarta.servlet.http.HttpServletRequest;
import jakarta.servlet.http.HttpServletResponse;

@WebServlet("/get-cookie-servlet")
public class GetCookieServlet extends HttpServlet {

	private static final long serialVersionUID = 1L;

	@Override
	protected void doGet(HttpServletRequest req, HttpServletResponse resp) throws ServletException, IOException {

		Cookie[] cookies = req.getCookies();

		String someCookieValue = "";

		if (cookies != null) {
			for (Cookie c : cookies) {
				if (c.getName().equals("some_cookie")) {
					someCookieValue = c.getValue();
				}
			}
		}

		resp.getWriter().append("The cookie value for some_cookie is: " + someCookieValue);
	}

}
As you can see, when a user visits this URL (“get-cookie-servlet”). If there is a cookie is set for the name “some_cookie”, it will be displayed on the browser screen.
Let’s build the project and visit “get-cookie-servlet” to make sure there isn’t any cookie is set:
No cookie is set
Now let’s visit the URL that set the cookie:
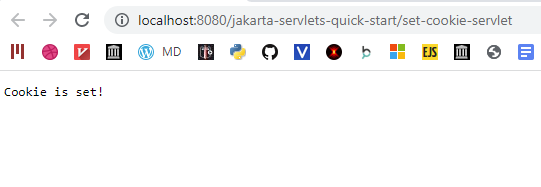
Cookie is set
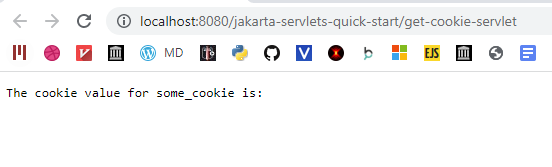
Let’s go back to the get-cookie-servlet URL and check if the value is displayed:

A cookie is set and we are able to display the value
Session Handling
Similar to cookies, a session is a mechanism to maintain states between client and server. The difference between cookie and session is while cookie stores the data in the browser and the browser can set cookies, a session is managed completely by the server. Thus, it is more secure to use sessions.
Let’s create two servlets to set and get cookies. This time, I’m going to set the name set by the user to a session variable called “your_name”. When the user visits other pages, I will display the name she sets previously.
Set a session attribute:
package com.datmt.servlet.sessions;

import java.io.IOException;

import jakarta.servlet.ServletException;
import jakarta.servlet.annotation.WebServlet;
import jakarta.servlet.http.HttpServlet;
import jakarta.servlet.http.HttpServletRequest;
import jakarta.servlet.http.HttpServletResponse;
import jakarta.servlet.http.HttpSession;

@WebServlet("/set-session")
public class SetSessionServlet extends HttpServlet {

	private static final long serialVersionUID = 1L;

	@Override
	protected void doGet(HttpServletRequest req, HttpServletResponse resp) throws ServletException, IOException {

		String yourName = req.getParameter("your_name");

		HttpSession session = req.getSession(true);
		session.setAttribute("your_name", yourName);

		resp.setContentType("text/html");

		resp.getWriter().println(""
				+ "<form method=\"get\" action=\"#\">"
				+ "<label>Please type your name</label>"
				+ "<input type=\"text\" name=\"your_name\" />"
				+ "<input type=\"submit\" value=\"Submit\" />"
				+ "</form>");

	}

}
As you can see, here I set the content type to “text/html” since the default content type is “text/plain”. The form has only one field for the user to submit her name.
Get session attribute:
package com.datmt.servlet.sessions;

import java.io.IOException;

import jakarta.servlet.ServletException;
import jakarta.servlet.annotation.WebServlet;
import jakarta.servlet.http.HttpServlet;
import jakarta.servlet.http.HttpServletRequest;
import jakarta.servlet.http.HttpServletResponse;
import jakarta.servlet.http.HttpSession;

@WebServlet("/get-session")
public class GetSessionServlet extends HttpServlet {

	private static final long serialVersionUID = 1L;

	@Override
	protected void doGet(HttpServletRequest req, HttpServletResponse resp) throws ServletException, IOException {

		HttpSession session = req.getSession(true);


		String greetings = "Hello, I don't know your name!";

		String yourName = session.getAttribute("your_name").toString();

		if (yourName != null) {
			greetings = "Hi, " + yourName + ". Welcome back!";

		}

		resp.getWriter().println(greetings);
	}

}
Let’s visit the “set-session” page and set a name:
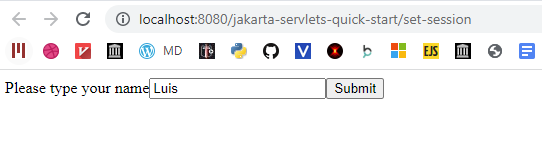
Setting session value in servlet
Since the form’s method is “GET”, the submitted value is displayed in the URL:

The submitted value displayed on the URL.
Now let’s navigate to the “get-session” page:

Getting session value in servlet
Sure enough, I can see the value I set previously.
Filter Example
Filters, as the name suggests, are used to filter out traffic to certain servlets based on the application’s business requirements. For example, you can use a filter to check authentication before letting web users access a certain path.
Consider this example: the application I’m developing has an area that is accessible by admin users only. For simplicity’s purposes, let’s assume the required credential is to have the custom header name “user” set. If a request doesn’t have that header set, it is not allowed to access the servlet.
Similar to a servlet, you can register a filter by using the web.xml file or using annotation. I prefer using annotation because it’s quicker.
Here is the filter:
package com.datmt.servlet.filters;

import jakarta.servlet.Filter;
import jakarta.servlet.FilterChain;
import jakarta.servlet.FilterConfig;
import jakarta.servlet.ServletException;
import jakarta.servlet.ServletRequest;
import jakarta.servlet.ServletResponse;
import jakarta.servlet.annotation.WebFilter;
import jakarta.servlet.http.HttpFilter;
import jakarta.servlet.http.HttpServletRequest;

import java.io.IOException;

import javax.management.RuntimeErrorException;


@WebFilter(urlPatterns = "/admin/*")
public class AdminFilter extends HttpFilter implements Filter {

	public void doFilter(ServletRequest request, ServletResponse response, FilterChain chain) throws IOException, ServletException {
		// TODO Auto-generated method stub
		// place your code here
		String user = ((HttpServletRequest) request).getHeader("user");
		System.out.println("Filtering request to admin pages");

		if (user == null) {
			response.getWriter().append("Missing credentials");

			return;
		}

		// pass the request along the filter chain
		chain.doFilter(request, response);
	}


}
As you can see, the filter checks if the header with the key “user” is set. If not, it writes “Missing credentials” to the response and stops processing the request further. Otherwise, the request will be passed to further filters down the line (if available).
Here is the servlet that is preceded by the filter:
package com.datmt.servlet;

import java.io.IOException;

import jakarta.servlet.ServletException;
import jakarta.servlet.annotation.WebServlet;
import jakarta.servlet.http.HttpServlet;
import jakarta.servlet.http.HttpServletRequest;
import jakarta.servlet.http.HttpServletResponse;

@WebServlet("/admin/only-me")
public class AdminOnlyServet extends HttpServlet {

	private static final long serialVersionUID = 1L;

	@Override
	protected void doGet(HttpServletRequest req, HttpServletResponse resp) throws ServletException, IOException {

		resp.getWriter().append("This area is for admin");

	}

}
Now, if I go to my browser and try to access that servlet. I will get “Missing credentials”:

Servlet filter prevents requests from going through
However, if I use Postman and set the header “user” for the request, I can get the response by the servlet:
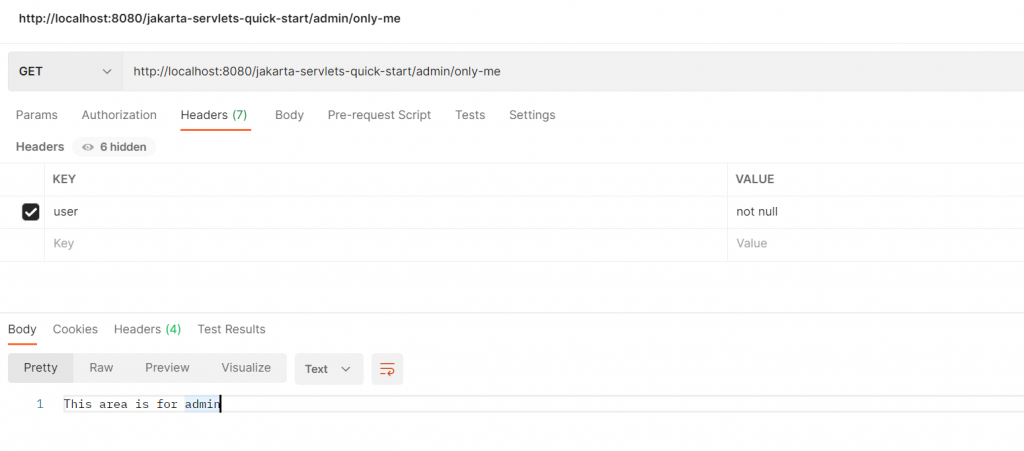
Servlet is accessible when setting the required credentials
Notice that this filter only intercepts requests to specific URL patterns (/admin/*) in this case. Other servlets that don’t have URLs that match this pattern are accessible without issues:
URL outside the filter’s scope are accessible
Conclusion
In this post, I’ve demonstrated how to create a simple Jakarta servlet project and create endpoints, and servlets to accept web traffic to the application.