
Table of Contents
Overview
JUnit 5 is a big topic. This post serves as a cheat sheet for the most common & basic functions to help you get started quickly with JUnit 5. Topics that need special care will have their own posts.
The business
Let’s say I’m writing an application to manage the fund of a family. People can deposit/withdraw. When withdrawing from the fun, the withdrawer needs to provide a reason. For example, mom withdraws $10 for groceries…
Here is the fund class:
package com.datmt.java.testing;

import java.util.Map;

public class FamilyFund {
    private float fund = 0f;
    private Map<WithdrawReason, Float> reasonBudget = Map.of(
            WithdrawReason.EMERGENCY, Float.MAX_VALUE,
            WithdrawReason.FOOD, 100f,
            WithdrawReason.MOVIE_TICKET, 10f,
            WithdrawReason.GAMBLING, 0f
    );

    public FamilyFund(float initialFund) {
        this.fund = initialFund;
    }


    public void setReasonBudget(Map<WithdrawReason, Float> reasonBudget) {
        this.reasonBudget = reasonBudget;
    }

    public synchronized void deposit(float amount) {
        assert amount > 0;
        this.fund += amount;
    }

    public void withdraw(float amount, WithdrawReason reason) {

        assert amount <= fund;
        assert amount <= reasonBudget.get(reason);
        if (reason.equals(WithdrawReason.GAMBLING)) {
            throw new RuntimeException("You SOB!");
        }

        fund -= amount;
    }

    public float getFund() {
        return fund;
    }
}
The WithdrawReason is an enum with the following values:
package com.datmt.java.testing;

public enum WithdrawReason {
    EMERGENCY,
    FOOD,
    GAMBLING,
    MOVIE_TICKET
}
You can also see at the beginning of the FamilyFund class, there is a map that signifies budgets for available reasons.
Let’s begin writing some tests
Write a simple unit test
Write a test to verify the deposit and withdraw function
    @Test
    void testDepositAndWithdraw() {
        var fund = new FamilyFund(100f);
        fund.deposit(100f);

        assertEquals(200f, fund.getFund(), "Init  100 + deposit 100 should be 200");
    }
This test initiates a fund with an existing amount of 100. When depositing another 100, the fund should be 200. There is no surprise in that.
Write tests to verify the not-happy cases
In the withdraw function, I had some logic that are good candidates for tests. I’m going to assert that:
- People cannot withdraw more than the existing fund
- You cannot spend money on gambling
- Withdraw amount cannot exceed the budget for the reasons
Assert that gambling is not allowed:
    @Test
    void test_fund_is_not_for_gambling() {
        var fund = new FamilyFund(100f);
        assertThrows(RuntimeException.class, () -> {
            fund.withdraw(0f, WithdrawReason.GAMBLING);
        });
    }
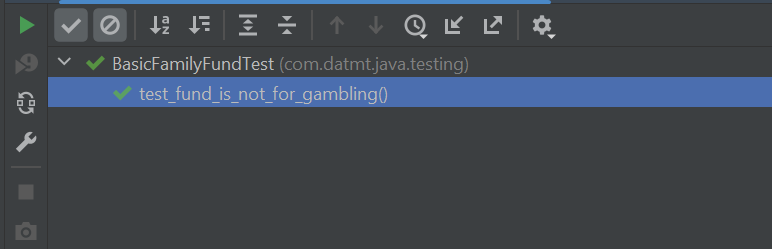
You can see here, I assert that when withdrawing with reason GAMBLING (even if the amount is 0), there should be an exception thrown.
Indeed, the test is passed because a runtime exception was thrown:
Next, I’m going to assert that withdrawing more than the available fund is not allowed. This is a family fund, not a bank, seriously:
    @Test
    @DisplayName("You cannot withdraw more than the available fund")
    void test_cannot_withdraw_more_than_available_fund() {
        var fund = new FamilyFund(100f);
        assertThrows(AssertionError.class, () -> {
            fund.withdraw(200f, WithdrawReason.EMERGENCY);
        });
    }
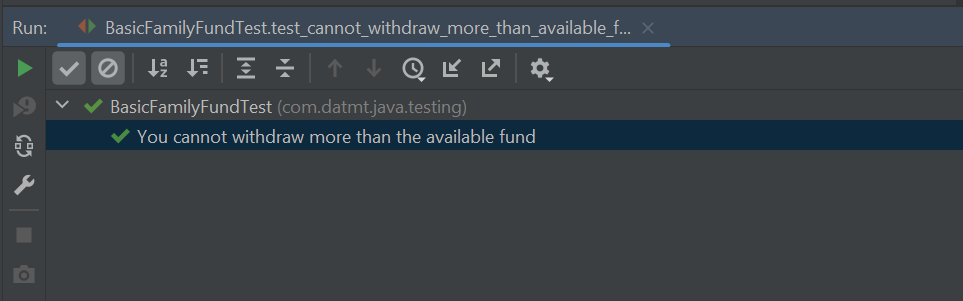
Notice that I placed an annotation name @DisplayName at the top of this test method. Using this annotation allows me to have a clear message when the test run (and also in the test report):
Finally, let’s make sure that people cannot withdraw more than the budget of the reason.
I’m going to keep the default budget limits here, which are:
- 10 for movie tickets
- 100 for food
Since there is no limit for emergencies, I’m going to skip that:
    @Test
    @DisplayName("Withdrawals cannot exceed allowed budget")
    void test_cannot_withdraw_more_than_allowed_budget() {
        var fund = new FamilyFund(1000f);
        assertThrows(AssertionError.class, () -> {
            fund.withdraw(200f, WithdrawReason.FOOD);
        });

        assertThrows(AssertionError.class, () -> {
            fund.withdraw(20f, WithdrawReason.MOVIE_TICKET);
        });

        fund.withdraw(10f, WithdrawReason.MOVIE_TICKET);
        assertEquals(990f, fund.getFund(), "Fund should be 990f after withdrawing 10f for movies");

        fund.withdraw(90f, WithdrawReason.FOOD);
        assertEquals(900f, fund.getFund(), "Fund should be 810f after withdrawing 90f for food");
    }
This test method does several things. First, it asserts that withdrawing more than the allowed budget will result in exceptions (lines 5 to line 11).
Next, it runs the happy path where people can withdraw the money and assert the amount left.
You can also see that in the assertEquals method, I supplied a message. These messages are printed when the tests fail.
Common Assertions
Up until now, I’ve used only two assert methods: assertEquals and assertThrows. However, JUnit provides many other assertion methods. I’m not going to cover all of them here but the most common ones.
assertEquals & assertNotEquals
These assertions are self-explanatory. You use it to assert the expected value and the actual value are equal/not equal.
    @Test
    void assert_equality() {
        assertEquals(1, 1);
        assertNotEquals(1, 2);

        assertEquals("hello", new String("hello"));
    }
assertNull & assertNotNull
This pair of assertions is quite simple to understand too. They assert if an object is null/not null.
    @Test
    void nullity_assertion() {
        var testString = "Hello";
        assertNotNull(testString);

        testString = null;
        assertNull(testString);

    }
assertArrayEquals
As the name suggests, this method asserts the equality of two arrays. Internally, it compares the arrays’ items index by index. Thus, if two arrays that have the same items are arranged in a different order, they are not equal.
This assertion not only supports primitive types but also supports deep comparison.
Let’s consider some examples:
    //This assertion will file
    @Test
    @Disabled
    void assert_array_equality() {
        var names = new String[]{"Jane", "Jill", "Jack"};
        var alsoNames = new String[]{"Jill", "Jack", "Jane"};

        assertArrayEquals(names, alsoNames);
    }
The two arrays have the same items but in different orders, so they are not equal.
This test will pass:
    @Test
    void assert_array_equality_equal() {
        var names = new String[]{"Jane", "Jill", "Jack"};
        var alsoNames = new String[]{"Jane", "Jill", "Jack"};

        assertArrayEquals(names, alsoNames);
    }
As mentioned, this method also support checking equality for arrays of complex objects with nested objects.
Consider having this TruckDriver entity:
    static class TruckDiver {
        private String name;
        private Experience ex;

        public TruckDiver(String name, int yearsOfExperience) {
            this.name = name;
            this.ex = new Experience();
            ex.setYears(yearsOfExperience);
        }

        static class Experience {
            private int years;

            public void setYears(int years) {
                this.years = years;
            }
        }
    }
Now, let’s create two arrays with two sets of drivers that have the same characteristics:
    @Test
    void test_array_equality_complex_objects() {
        var jane = new TruckDiver("Jane", 10);
        var karen = new TruckDiver("Karen", 18);

        var janeClone = new TruckDiver("Jane", 10);
        var karenClone = new TruckDiver("Karen", 18);


        var localDrivers = new TruckDiver[]{jane, karen};
        var alsoLocalDrivers = new TruckDiver[]{janeClone, karenClone};

        assertNotSame(localDrivers, alsoLocalDrivers);
        assertArrayEquals(localDrivers, alsoLocalDrivers);
    }
If you run this, it will pass too.
As you can see, I created two different arrays with different instances of TruckDriver. The clone and the original object share the characteristics though.
On line 13, I also ran an assertion to make sure that these two arrays are not pointing to the same object.
assertIterableEquals
This assertion returns true when two iterables return two equal lists. Knowing assertArrayEquals already, this should not be a problem for you.
Since this method only compares the return lists, the iterables could have different types:
    @Test //this test passes
    void test_assert_iterable_equality() {
        var names = List.of("Jane", "Jake", "Jill");
        var alsoNames = new LinkedList<>(List.of("Jane", "Jake", "Jill"));
        assertIterableEquals(names, alsoNames);
    }
assertSame & assertNotSame
These two methods assert if two objects have the same memory address:
    @Test
    void test_same_object() {
        var x = "Hello";
        var y = "Hello";

        var dog = "Dog";
        var alsoDog = new String("Dog");

        assertSame(x, y);
        assertNotSame(dog, alsoDog);
    }
If you find the assertion on line 9 strange, you may want to refresh your knowledge of String in Java 😉
assertAll
This method lets you submit multiple executables and asserts none throws exceptions:
This will not pass:
    @Test
    void test_multiple_assertion_with_assert_all() {
        assertAll(
                () -> {
                    var x = 1/0;
                },
                () -> {

                }

                );
    }
assertThrows & assertDoesNotThrow
assertTimeout & assertTimeoutPreemptively
assertInstanceOf
assertLinesMatch
Assumptions
Specify the Execution Order
To control the order of test execution, you apply the annotation @TestMethodOrder at the test class level. Quoting from JUnit documentation:
If @TestMethodOrder is not explicitly declared on a test class, inherited from a parent class, or declared on a test interface implemented by a test class, test methods will be ordered using a default algorithm that is deterministic but intentionally nonobvious.
JUnit javadoc
Consider the following test class:
package com.datmt.java.testing;

import org.junit.jupiter.api.MethodOrderer;
import org.junit.jupiter.api.Test;
import org.junit.jupiter.api.TestMethodOrder;

import static org.junit.jupiter.api.Assertions.assertEquals;

class ExecutionOrderFamilyFundTest {

    private static final FamilyFund fund = new FamilyFund(200f);
    @Test
    void test_withdraw_on_shared_fund() {
        fund.withdraw(250f, WithdrawReason.EMERGENCY);
        assertEquals(50f, fund.getFund());
    }
    @Test
    void test_deposit_on_shared_fund() {
        fund.deposit(100f);
        assertEquals(300f, fund.getFund());
    }

    @Test
    void test_withdraw_small_amount() {
       fund.withdraw(10f, WithdrawReason.MOVIE_TICKET);

       assertEquals(40f, fund.getFund());
    }

}
As you can see, if the tests are run in order, the fund starts with 200f then the first withdrawal method would cause an error since there aren’t enough funds for that withdrawal.
When I ran this, I got a different error:
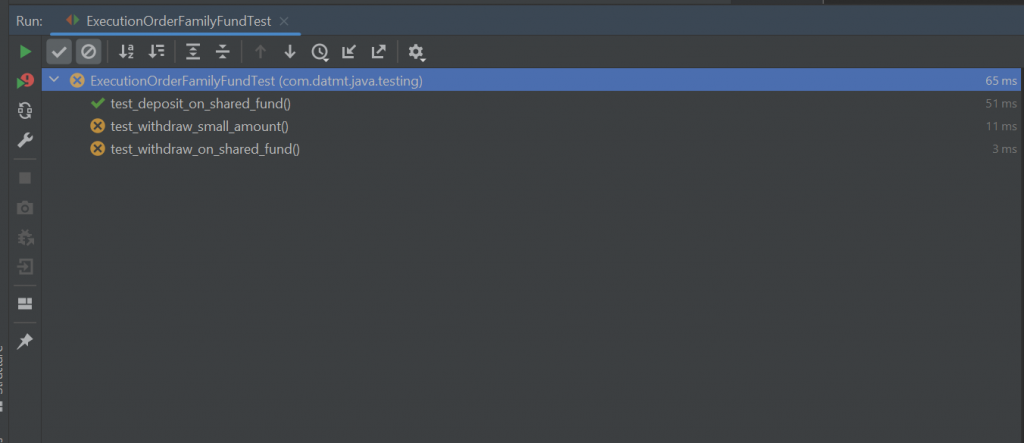
As you can see, on my run, the deposit ran first, thus, it makes the following two tests fail.
To make these tests run successfully, the deposit test needs to run first, then the withdraw 250f method, and finally, the withdraw 10f method.
So, how do you set the order of tests run in JUnit?
It’s quite simple. Here are things you need to do:
- Annotate the test class with
@TestMethodOrder. there are several options. However, in this post, I useOrderAnnotation. - On every test method, you need to run in order, you put the annotation
@Orderwith a number. Lower numbers signify the method should run earlier.
Here is the test class again, with the annotations to make sure tests are run in the specified order:
@TestMethodOrder(MethodOrderer.OrderAnnotation.class)
class ExecutionOrderFamilyFundTest {

    private static final FamilyFund fund = new FamilyFund(200f);
    @Test
    @Order(2)
    void test_withdraw_on_shared_fund() {
        fund.withdraw(250f, WithdrawReason.EMERGENCY);
        assertEquals(50f, fund.getFund());
    }
    @Test
    @Order(1)
    void test_deposit_on_shared_fund() {
        fund.deposit(100f);
        assertEquals(300f, fund.getFund());
    }

    @Test
    @Order(3)
    void test_withdraw_small_amount() {
       fund.withdraw(10f, WithdrawReason.MOVIE_TICKET);

       assertEquals(40f, fund.getFund());
    }

}
Sure enough, all tests are green:

Test inside test (@Nested)
When you need to arrange tests into logical groups, using the @Nested annotation is a good solution.
For example, I want to separate tests for withdrawal and deposit into separate groups. This could be one implementation:
package com.datmt.java.testing;
import org.junit.jupiter.api.DisplayName;
import org.junit.jupiter.api.Nested;
import org.junit.jupiter.api.Test;
import static org.junit.jupiter.api.Assertions.assertEquals;
import static org.junit.jupiter.api.Assertions.assertThrows;
class NestedFamilyFundTest {
@Nested
class TestWithdraw {
private FamilyFund fund = new FamilyFund(100f);
@Test
@DisplayName("Test withdrawal")
void testWithdrawInNestedClass() {
fund.withdraw(10f, WithdrawReason.MOVIE_TICKET);
assertEquals(90f, fund.getFund());
}
}
@Nested
class TestDeposit {
private FamilyFund fund = new FamilyFund(100f);
@Test
@DisplayName("Test deposit")
void testDepositInNestedClass() {
fund.deposit(10f);
assertEquals(110f, fund.getFund());
}
}
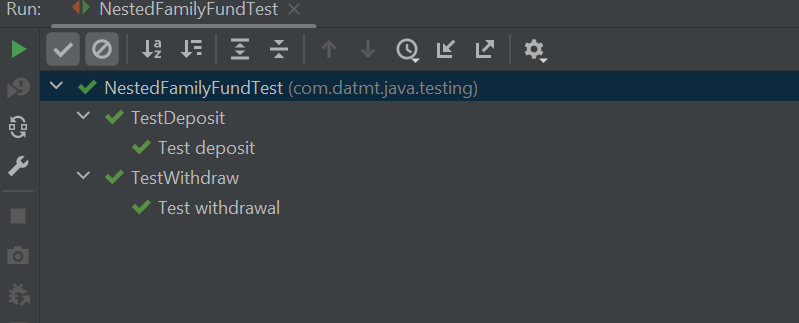
}When I run the tests, they work as expected:
Run tests Multiple times with Repeated test
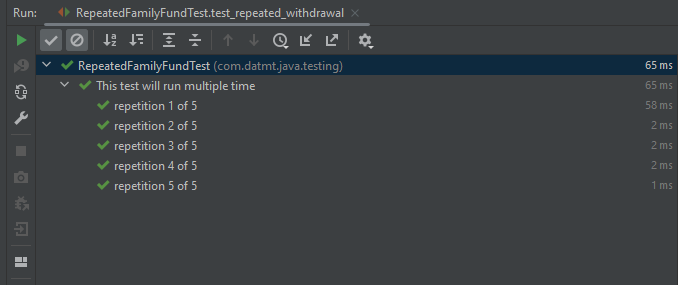
If your business logic requires you to run a test repeatedly, you can use the @RepeatedTest annotation and pass in the number of repetitions:
    @RepeatedTest(5)
    @DisplayName("This test will run multiple time")
    void test_repeated_withdrawal() {
        var fund = new FamilyFund(10f);

        fund.withdraw(10f, WithdrawReason.MOVIE_TICKET);

        assertEquals(0f, fund.getFund());
    }
The test, as expected, was repeated 5 times:
Parameterized tests
When you run to run tests with different arguments without writing multiple test methods, using parameterized tests is a good choice.
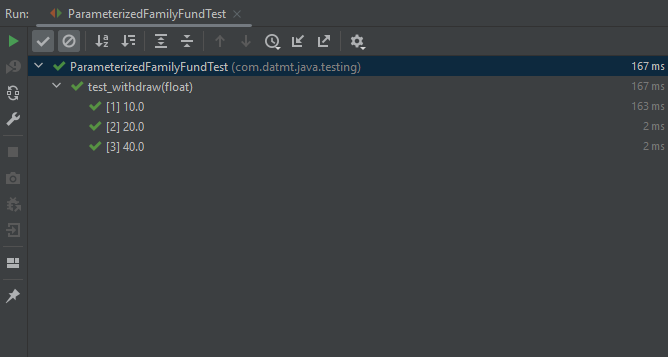
For example, I want to test withdrawing various amounts on a certain fund, I can setup a test like this:
    @ParameterizedTest
    @ValueSource(floats= {10f, 20f, 40f})
    void test_withdraw(float amount) {
        var fund = new FamilyFund(100);

        assertDoesNotThrow(() -> fund.withdraw(amount, WithdrawReason.EMERGENCY));
    }
As you can see, there are two annotations needed: @ParameterizedTest and @ValueSource. The @ValueSoure annotation provides the values to run. The test method accepts one parameter, which is the value from the @ValueSource for each run:
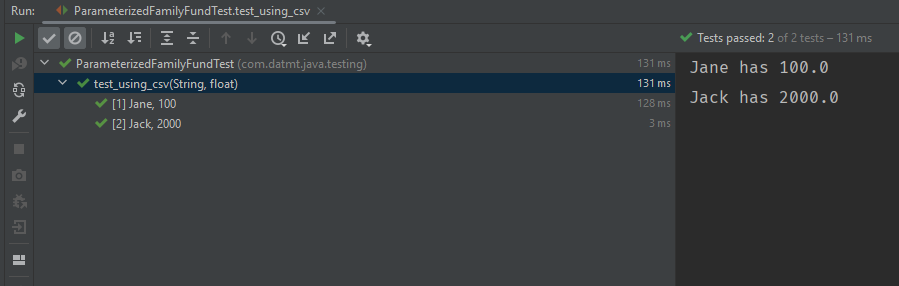
Feed CSV
You pass the data in CSV format:
    @ParameterizedTest
    @CsvSource({"Jane, 100", "Jack, 2000"})
    void test_using_csv(String name, float amount) {

        System.out.println(name + " has " + amount);

    }
Here, as we pass the data in CSV, JUnit is smart enough to parse the data and pass them to the test method as parameters. Running the test would provide the expected result:
Feed CSV file
Instead of passing a CSV string, you can pass a CSV file to the test by using @CSVFileSource
Let’s create a file called p1.csv and put it under the test resource folder:
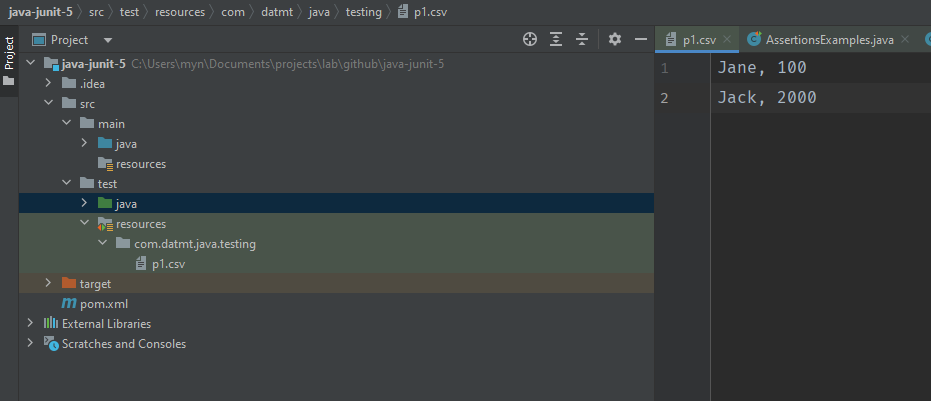
Now, create a test method refer to that file:
    @ParameterizedTest
    @CsvFileSource(resources= "p1.csv")
    void test_using_csv_file(String name, float amount) {

        System.out.println(name + " has " + amount);

    }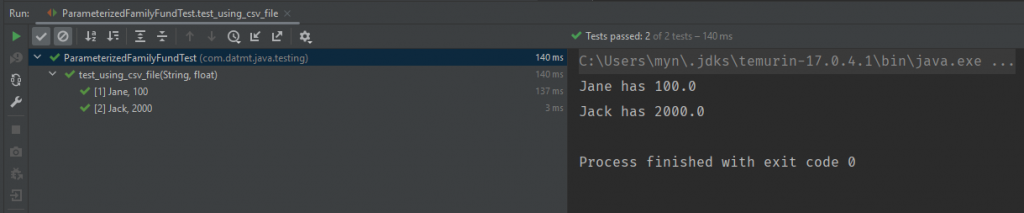
Skip a certain test
You can always skip certain tests by using the @Disabled annotation. There are many reasons for this (for the build to pass, for example 😉 )
This test will not run since it’s marked as @Disabled:
    //This assertion will file
    @Test
    @Disabled
    void assert_array_equality() {
        var names = new String[]{"Jane", "Jill", "Jack"};
        var alsoNames = new String[]{"Jill", "Jack", "Jane"};

        assertArrayEquals(names, alsoNames);
    }
Lifecycle management (@Before, @After)
If you want to run specific code before/after each/all tests, there are annotations available to help you do just that.
Consider the following example:
package com.datmt.java.testing;

import org.junit.jupiter.api.AfterAll;
import org.junit.jupiter.api.AfterEach;
import org.junit.jupiter.api.BeforeAll;
import org.junit.jupiter.api.BeforeEach;
import org.junit.jupiter.api.DisplayName;
import org.junit.jupiter.api.Test;

public class LifecycleFamilyFundTest {
    @BeforeAll
    static void setupAll() {
        System.out.println("This runs before all tests");
    }
    @BeforeEach
    void setupEach() {
        System.out.println("this run before every tests");
    }

    @Test
    @DisplayName("Test 1")
    void test_1() {
        System.out.println("Inside test 1");
    }

    @Test
    @DisplayName("Test 2")
    void test_2() {
        System.out.println("Inside test 2");
    }

    @AfterEach
    void afterEach() {
        System.out.println("this runs after every tests");
    }

    @AfterAll
    static void afterAll() {
        System.out.println("This runs after all tests");
    }

}
This is the result:
Conclusion
This is a quick introduction to writing unit tests with JUnit 5. There are many more features that I haven’t covered. Feel free to explore the framework to learn more about JUnit 5.

I build softwares that solve problems. I also love writing/documenting things I learn/want to learn.