Table of Contents
Overview
When working with Spring projects, you probably use ORM instead of raw JDBC as I demonstrated in the last post. With Spring AOP, you can simply use the @Transactional annotation to handle transactions in your app.
Let’s learn how to use the @Transactional annotation properly in Spring applications.
Basic @Transactional Usage
Let’s simulate the example with Alice and Bob. Initially, they both have 1000 credits in their account. For table schema, please refer to the previous posts in the series.
I’m going to create a model to map to the users in the database:
package com.datmt.springdata.springdatajpatransactional;


import lombok.Getter;
import lombok.Setter;

import javax.persistence.Entity;
import javax.persistence.Id;
import javax.persistence.Table;

@Entity
@Table(name="bank_user")
@Getter
@Setter
public class BankUser {
    @Id
    private Long id;

    private String name;

    private Long balance;
}
Next, let’s create a service bean that handles the credit transfer process:
package com.datmt.springdata.springdatajpatransactional;

import org.springframework.jdbc.core.RowMapper;
import org.springframework.jdbc.core.support.JdbcDaoSupport;
import org.springframework.transaction.annotation.Transactional;

import java.sql.ResultSet;
import java.sql.SQLException;

public class BankTransferService extends JdbcDaoSupport {


    @Transactional
    public void transfer(String from, String to, Long amount) {
        withdraw(from, amount);
        deposit(to, amount);
    }

    public void resetBalance() {
       getJdbcTemplate().update("UPDATE bank_user SET balance = 1000") ;
    }
    private BankUser getUser(String username) {
        return getJdbcTemplate().query("SELECT * FROM bank_user WHERE name = '" + username + "'", new RowMapper<BankUser>() {
            @Override
            public BankUser mapRow(ResultSet rs, int rowNum) throws SQLException {
                var bankUser = new BankUser();
                bankUser.setId(rs.getLong("id"));
                bankUser.setName(rs.getString("name"));
                bankUser.setBalance(rs.getLong("balance"));
                return bankUser;
            }
        }).get(0);
    }

    private void withdraw(String user, Long amount) {
        var bankUser = getUser(user);
        var newBalance = bankUser.getBalance() - amount;
        getJdbcTemplate().update("UPDATE bank_user SET balance = ? WHERE name = ?", newBalance, user);
    }

    private void deposit(String user, Long amount) {
        var bankUser = getUser(user);
        var newBalance = bankUser.getBalance() + amount;
        getJdbcTemplate().update("UPDATE bank_user SET balance = ? WHERE name = ?", newBalance, user);
    }
}
The logic in this class is quite simple. There are four methods:
- withdraw
- deposit
- resetBalance
- transfer
Their names are self-explanatory.
Let’s start transferring money from Alice to Bob in case there isn’t any problem:
public class SpringDataJpaTransactionalApplication {

    public static void main(String[] args) {

        var appContext = new AnnotationConfigApplicationContext(AppConfig.class);
        var bankTransferService = appContext.getBean(BankTransferService.class);
        bankTransferService.resetBalance();
        bankTransferService.transfer("Alice", "Bob", 100L);

    }

}
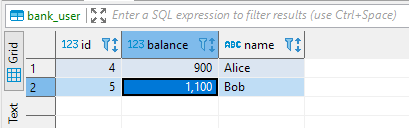
After running this code, if you check the database, you will see that the new balances reflect the data correctly:
Now, let’s simulate an exception after the withdrawal method. For example, the following code will throw an exception in the deposit method when the amount is greater than 99:
    private void deposit(String user, Long amount) {
        if (amount >= 100)
            throw new RuntimeException("I cannot get that much!");
        var bankUser = getUser(user);
        var newBalance = bankUser.getBalance() + amount;

        getJdbcTemplate().update("UPDATE bank_user SET balance = ? WHERE name = ?", newBalance, user);
    }
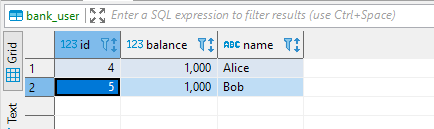
Now, if you run the code in the main method again, for sure the exception will be thrown. However, after the method is executed, both Alice and Bob still have 1000 credits:
Now you see the basic functionality of the @Transactional annotation. Let’s dig deeper into this.
Understand the Propagation Transaction Attributes
Transaction propagation specifies the way transactions are handled in the situation of one transactional method called another transactional method.
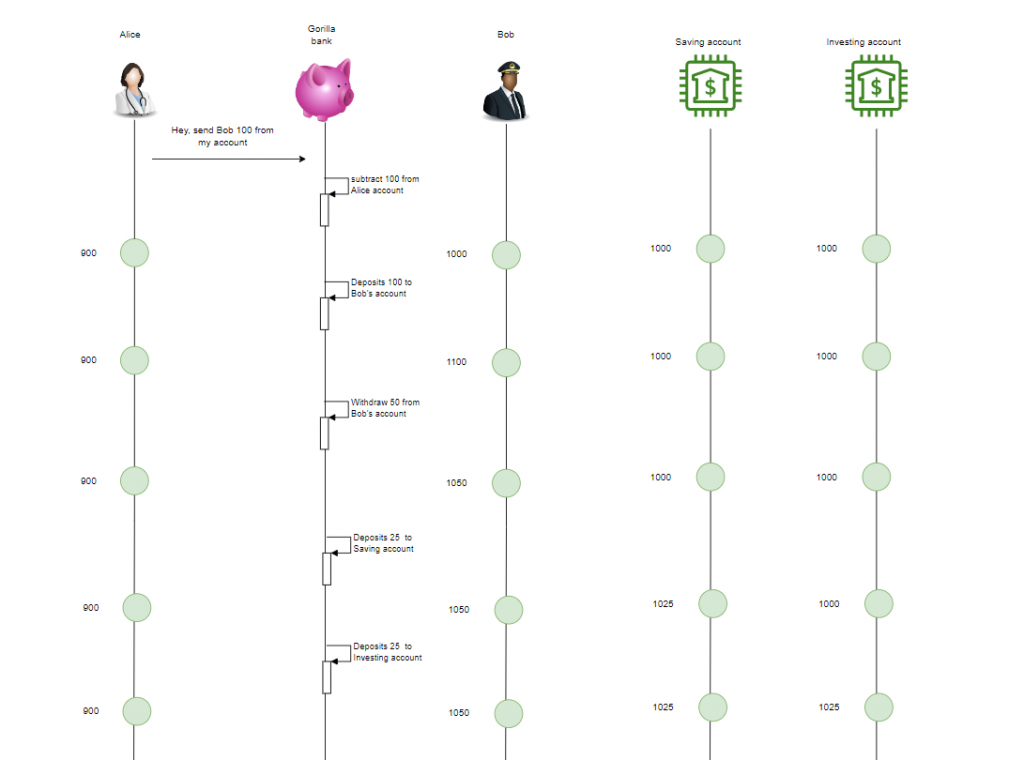
Imagine this situation, Bob configured his banking application to whenever he receives any credit, that amount would be split in three: 25% to his savings account and 25% to his investing account, and 50% to his main account (the account that Alice sends to).
So, in the case of Alice sending Bob 100 credits, things get a bit complex like this:
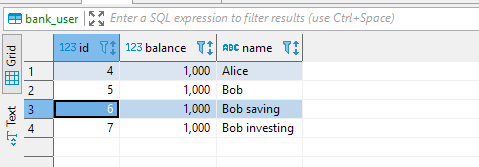
So, in the database, there should be two more bank users representing Bob’s savings and investing accounts. Let’s insert the manually:
In the bank transfer service class, I’m going to reuse the transfer method:
    @Transactional
    public void sendAndSplitToOtherAccounts(String senderName, String recipientName, Long amount,
                                            String recipientSavingAccount, String recipientInvestingAccount) {
        transfer(senderName, recipientName, amount);
        transfer(recipientName, recipientSavingAccount, amount / 4);
        transfer(recipientName, recipientInvestingAccount, amount / 4);
    }
Here, you can see that this method uses a fixed ratio as mentioned above (50%, 25%, 25%). It’s not flexible and in real life, you may not implement it like this. However, for the demonstration’s purpose, this would work.
You can notice that this new method is also annotated with the @Transactional annotation, just like the transfer method. When the first transfer method inside this new method is called,
- should a transaction already exist?
- Should the transfer method initiate a new transaction?
- Should the transfer method throw an exception if there is an ongoing transaction?
- …
You can manage all that with the transaction propagation property.
There are seven possible values. Here is a brief introduction to all of them:
| Propagation | Explanation |
| REQUIRED | This is the default attribute. In our case, the transfer method would run with an existing transaction if available. If there is no transaction available, it should create a new transaction and run inside that. |
| REQUIRES_NEW | The method should start a new transaction regardless if any transaction exists. The existing transaction is suspended. |
| SUPPORTS | If there is no existing transaction, no transaction will be created. However, if there is a transaction exists, the method should join that transaction. |
| NOT_SUPPORTED | The method should not run within a transaction. An exception will be thrown if that’s the case. |
| MANDATORY | The method requires an existing transaction. If not, an exception will be thrown |
| NEVER | This is the opposite of MANDATORY |
| NESTED | Uses a single physical transaction with multiple savepoints that it can roll back to |
In the case above, if there is no explicit propagation defined, the REQUIRED option is used. That means the method sendAndSplitToOtherAccounts will start a transaction and all three transfer methods will use the transaction started by the outer method.
Problems with concurrent transactions
When multiple transactions operate on a shared data set, data can be corrupted if the isolation level is not handled correctly.
Here are the problems that may occur with concurrent transactions on the shared data sets:
| Dirty read | Given two transactions T1 and T2 both try to update Bob’s balance. T2 comes first, modify the balance but haven’t committed. T1 read that uncommitted balance and does its calculation. Later T2 experience an exception and rolled back. The value that T1 reads and uses for calculation is no longer valid. |
| Nonrepeatable read | Still with T1 and T2. First, T1 read the balance from the database. After that, T2 comes and modifies the balance. If T1 reads the balance again, it will see a different value |
| Phantom read | T1 selects rows that have a balance greater than a certain amount. T2 comes an inserts new rows that satisfy T1’s select condition. If T1 runs the select query again, it will get more rows than the first read. |
These problems can all be solved by setting the right level of isolation. There are options that solve some problems. There is an option that can solve all. What’s the trade-off? The answer is performance.
Let’s find out more about the isolation levels and how they solve these problems in the next section.
Mitigate concurrent transaction issues with isolation levels
The isolation level affects the number of concurrent users who can access a piece of data at a point in time. A lower level permits more access with the risk of data inconsistency/corruption. A higher level guarantees a higher level of data consistency at the cost of performance.
The isolation levels are managed by the database system, not by ORMs or frameworks.
Here are the four isolation levels defined by ANSI/ISO:
| Isolation Level | Description | Level |
| Serializable | Highest isolation level. None of the problems mentioned above are possible. Worst performance though. | |
| Repeatable reads | Phantom-read is possible. Other problems not possible | |
| Read committed | Dirty read is not possible, other problems are possible | |
| Read uncommitted | All problems are possible |
To get more details about the isolation levels, I recommend you check this write-up on Wikipedia.
Spring framework supports all isolation levels.
To specify a different isolation level other than DEFAULT, you can do this:
@Transactional(isolation = Isolation.REPEATABLE_READ)
public void doSomeTransaction(){
//.Some code
}
Conclusion
In this post, I’ve shown you how the @Transactional annotation works in the Spring framework. You can use the annotation with default values (without specifying anything) and it may serve you in most cases. However, in some cases, you may need to specify the propagation attribute and/or the isolation level to achieve your business needs.
As always, the code is available on Github here.

I build softwares that solve problems. I also love writing/documenting things I learn/want to learn.