
Table of Contents
Overview
Now we have the API ready, it’s time to create the UI.
CRUD Wallet
Let’s first create a service to talk to the API about wallets.
npm run ng g s services/wallet
We also need to create the interfaces that represent wallet, transaction and file upload:
npm run ng g i interfaces/page-response
npm run ng g i interfaces/wallet
npm run ng g i interfaces/file-upload
npm run ng g i interfaces/transaction
These interfaces map 1:1 to the models we have on the backend API.
export interface Wallet {
    id?: string;
    ownerId?: string;
    title: string;
    description?: string;
    balance?: number;
    currency?: string;
    createdDate?: Date;
}


export interface Transaction {
    id?: string;
    walletId?: string;
    title: string;
    description?: string;
    category?: string;
    type?: string;
    images?: string[];
    amount?: number;
    currency?: string;
    ownerId?: string;
    createdDate?: Date;
}

export interface PageResponse<T> {
  data: T[];
  page: number;
  size: number;
  totalPages: number;
  totalElements: number;
}


export interface FileUpload {
  id?: string;
  s3Path?: string;
  ownerId?: string;
}
And here is the complete wallet service:
@Injectable({
  providedIn: 'root'
})
export class WalletService {

  private WALLET_API = environment.API_SERVER + 'api/wallets';

  constructor(private http: HttpClient) {
  }

  create(wallet: Wallet): Observable<Wallet> {
    return this.http.post<Wallet>(this.WALLET_API, wallet)
      .pipe(
        shareReplay()
      );
  }

  update(wallet: Wallet): Observable<Wallet> {
    return this.http.put<Wallet>(this.WALLET_API, wallet)
      .pipe(
        shareReplay()
      );
  }

  delete(id: string): Observable<any> {
    return this.http.delete(this.WALLET_API + `/${id}`)
      .pipe(
        shareReplay()
      );
  }

  list(): Observable<PageResponse<Wallet>> {
    return this.http.get<PageResponse<Wallet>>(this.WALLET_API)
      .pipe(
        shareReplay()
      );
  }
}
Now we are ready to create the UI for the wallet.
Creating UI for wallet management
Let’s create the component using Angular CLI:
npm run ng g c components/home
npm run ng g c components/wallet-management
npm run ng g c components/wallet-details
Here, we created three components, one for home (the welcome screen), one for wallet management, and one for viewing wallet details (including transactions).
Now do we navigate to the wallet screen? Let’s configure the routing.
Open app.routing.moudle.ts and configure our routes:
const routes: Routes = [
  {
    path: '',
    component: HomeComponent,
    title: 'Home',
  },
  {
    path: 'wallets',
    title: 'Wallets',
    canActivate: [AuthGuard],
    children: [
      {
        path: '',
        component: WalletManagementComponent,
        title: 'Wallets',
      },
      {
        path: ':id',
        component: WalletDetailsComponent,
        title: 'Wallet Details'
      }
    ]
  }
];

@NgModule({
  imports: [RouterModule.forRoot(routes)],
  exports: [RouterModule]
})
export class AppRoutingModule {
}
These are all the routes we need for this app.
Let’s first create the Wallet Management screen.
Wallet management
We are going to split the wallet management screen into two parts:
- On the left, there would be a form to create a new wallet
- On the right, that would be the list of wallets
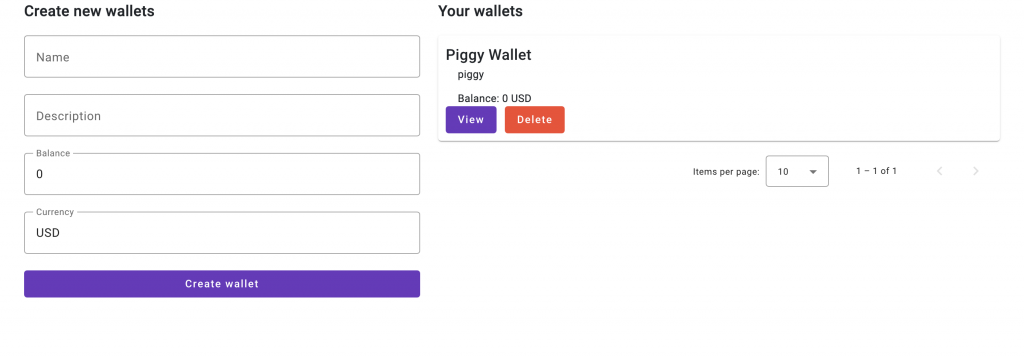
First, consider the HTML:
<div class="row">
<div class="col-5">
<h2>Create new wallets</h2>
<div class="create-wallet-form">
<mat-form-field appearance="outline">
<mat-label>Name</mat-label>
<input matInput [(ngModel)]="newWallet.title">
</mat-form-field>
<mat-form-field appearance="outline">
<mat-label>Description</mat-label>
<input matInput [(ngModel)]="newWallet.description">
</mat-form-field>
<mat-form-field appearance="outline">
<mat-label>Balance</mat-label>
<input matInput [(ngModel)]="newWallet.balance">
</mat-form-field>
<mat-form-field appearance="outline">
<mat-label>Currency</mat-label>
<input matInput [(ngModel)]="newWallet.currency">
</mat-form-field>
<button mat-flat-button color="primary" (click)="createWallet()">Create wallet</button>
</div>
</div>
<div class="col-7">
<h2>Your wallets</h2>
<div id="list-wallets">
<div *ngFor="let wallet of wallets">
<mat-card class="single-wallet">
<mat-card-title>{{wallet.title}}</mat-card-title>
<mat-card-content>
<p>{{wallet.description}}</p>
<p>Balance: {{wallet.balance}} {{wallet.currency}}</p>
</mat-card-content>
<mat-card-footer>
<button mat-flat-button color="primary" routerLink="/wallets/{{wallet.id}}">View</button>
<button mat-flat-button color="warn" (click)="deleteWallet(wallet.id!)">Delete</button>
</mat-card-footer>
</mat-card>
<p></p>
</div>
</div>
<mat-paginator
(page)="onPageChange($event)"
[length]="totalItems"
[pageIndex]="pageIndex"
[pageSizeOptions]="[5, 10, 25, 100]"
[pageSize]="pageSize"
aria-label="Select page">
</mat-paginator>
</div>
</div>
And this is the component:
@Component({
  selector: 'app-wallet-management',
  templateUrl: './wallet-management.component.html',
  styleUrls: ['./wallet-management.component.scss']
})
export class WalletManagementComponent implements OnInit {

  pageSize: number = 10;
  pageIndex: number = 0;
  totalItems: number = 0;
  totalPages: number = 0;

  newWallet: Wallet = {
    title: '',
    description: '',
    currency: 'USD',
    balance: 0,
    id: ''

  }

  wallets: Wallet[] = [];

  constructor(private walletService: WalletService) {
  }

  ngOnInit() {
    this.fetchWallets(this.pageSize, this.pageIndex);
  }


  createWallet() {
    this.walletService.create(this.newWallet).subscribe({
      next: (response) => {
        this.resetWallet();
        this.fetchWallets(this.pageSize, this.pageIndex);
      },
      error: (error) => {
        console.log(error);
      }
    });
  }

  resetWallet() {
    this.newWallet = {
      title: '',
      description: '',
      currency: 'USD',
      balance: 0,
    }
  }

  onPageChange($event: PageEvent) {
    this.fetchWallets($event.pageSize, $event.pageIndex)
  }

  fetchWallets(pageSize: number, pageIndex: number) {
    this.walletService.list(pageIndex, pageSize).subscribe({
      next: (response) => {
        this.wallets = response.data;
        this.totalItems = response.totalElements;
        this.totalPages = response.totalPages;
      }
    });
  }

  deleteWallet(id: string) {
    this.walletService.delete(id).subscribe({
      next: (response) => {
        this.fetchWallets(this.pageSize, this.pageIndex);
      },
      error: (error) => {
        console.log(error);
      }
    });
  }
}
And that’s all about wallet management. Now, let’s move on to the wallet details screen.
The wallet details screen
This screen is similar to the wallet management screen where we have a form on the left to create new transactions and a list on the right to display the list of transactions.
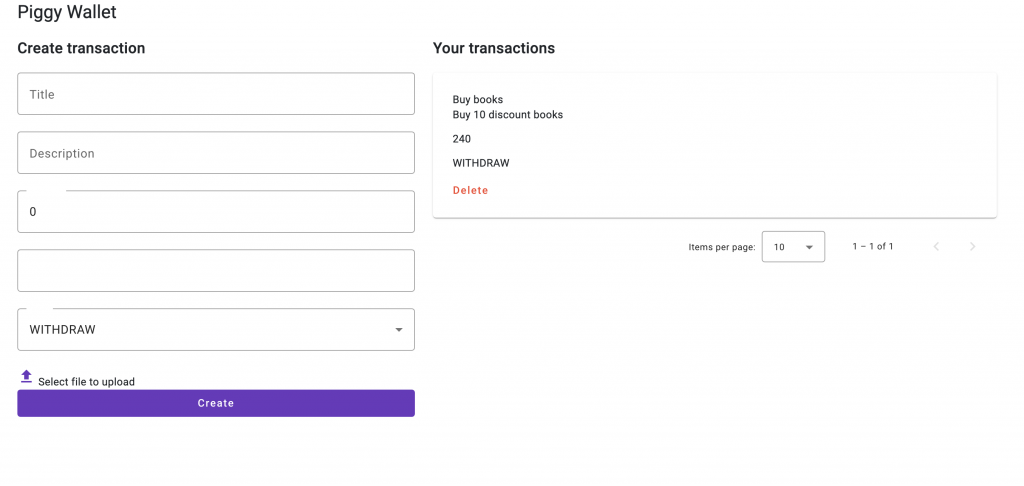
However, we need to support for image upload and also display the image in the transaction list, if any.
The image upload component
I don’t do drag-and-drop upload in this series to keep things simple. First, let’s create a new component for image upload:
npm run ng g c components/file-upload
This component is very simple:
<div id="selected-files" *ngIf="selectedFile">
    {{selectedFile.name}}
</div>

<label for="file">
    <mat-spinner style="max-width: 15px; max-height: 15px;" *ngIf="isUploading"></mat-spinner>
    <mat-icon color="primary" *ngIf="!isUploading">file_upload</mat-icon>
    Select file to upload
</label>
<input (change)="onFileSelect($event)" type="file" id="file">
@Component({
    selector: 'app-file-upload',
    templateUrl: './file-upload.component.html',
    styleUrls: ['./file-upload.component.scss']
})
export class FileUploadComponent {

    selectedFile: File | null = null;
    isUploading: boolean = false;

    constructor(private fileUploadService: FileUploadService) {
    }

    @Output()
    onFileUploaded = new EventEmitter<FileUpload>();

    onFileSelect(event: Event) {
        this.selectedFile = (event.target as HTMLInputElement).files![0];

        if (this.selectedFile) {
            const formData = new FormData();
            formData.append("file", this.selectedFile);
            this.isUploading = true;
            this.fileUploadService.upload(formData).subscribe({
                next: (response) => {
                    console.log(response);
                    this.onFileUploaded.emit(response);
                    this.isUploading = false;
                },
                error: (error) => {
                    console.log(error);
                    this.isUploading = false;
                }
            });
        }
    }
}
As you can see, once the image is selected, it will be uploaded to the server. When the upload is done, there is an event emitter that emits the result to the parent component, which is the wallet details page.
View image component
In order to view the image once uploaded, we need to create a new component.
npm run ng g c components/file-view
However, before that, we need to have an API endpoint that let user get the image by image id:
    public record ValueResponse(String value) {
    }

    public String getFileUrl(String id) throws URISyntaxException {
        var file = fileUploadRepository.findById(id).orElseThrow();
        var awsS3File = new AwsS3File();
        return awsS3File.generateDownloadURL(file.getS3Path()).toURI().toString();
    }

    @GetMapping("/view/{id}")
    public ValueResponse getFile(@PathVariable String id) throws URISyntaxException {
        return new ValueResponse(fileUploadService.getFileUrl(id));
    }
in the file upload service (frontend), add a method to call to this endpoint:
    getFileUrl(id: string): Observable<ValueResponse> {
        return this.http.get<ValueResponse>(this.FILE_API + `/view/${id}`).pipe(shareReplay());
    }
and now we can create the file-view component:
<mat-spinner *ngIf="isLoading; else imageView"></mat-spinner>

<ng-template #imageView>
    <img [src]="imageUrl">
</ng-template>
As you can see, it shows a spinner when the image is not ready. Once the image URL is available, it shows and image element.
Here is the typescript code of the component:
@Component({
    selector: 'app-file-view',
    templateUrl: './file-view.component.html',
    styleUrls: ['./file-view.component.scss']
})
export class FileViewComponent {

    isLoading: boolean = false;

    @Input()
    imageId: string = '';

    imageUrl: string = '';

    constructor(private fileUploadService: FileUploadService) {

    }

    ngOnChanges(changes: { [property: string]: SimpleChange }) {
        let change: SimpleChange = changes['imageId'];

        if (change) {
            this.isLoading = true;
            this.fileUploadService.getFileUrl(this.imageId).subscribe({
                next: (response) => {
                    console.log(response)
                    this.imageUrl = response.value;
                    this.isLoading = false;
                },
                error: (err) => {
                    console.log(err);
                    this.isLoading = false;
                }
            });
        }

    }
}
This component will take an imageId as an input param. We catch the value using the ngOnChanges hook.
Now all, the support components are ready, let’s create the wallet details view:
<h1>{{wallet?.title}}</h1>

<div class="row">
    <div class="col-5">
        <h2>Create transaction</h2>

        <div id="create-transaction-form">
            <mat-form-field appearance="outline">
                <mat-label>Title</mat-label>
                <input matInput placeholder="Title" [(ngModel)]="emptyTransaction.title">
            </mat-form-field>

            <mat-form-field appearance="outline">
                <mat-label>Description</mat-label>
                <input matInput placeholder="Title" [(ngModel)]="emptyTransaction.description">
            </mat-form-field>
            <mat-form-field appearance="outline">
                <mat-label>Amount</mat-label>
                <input matInput placeholder="Title" [(ngModel)]="emptyTransaction.amount">
            </mat-form-field>

            <mat-form-field appearance="outline">
                <mat-label>Category</mat-label>
                <input matInput placeholder="Title" [(ngModel)]="emptyTransaction.category">
            </mat-form-field>


            <mat-form-field appearance="outline">
                <mat-label>Type</mat-label>
                <mat-select [(ngModel)]="emptyTransaction.type">
                    <mat-option *ngFor="let type of ['DEPOSIT', 'WITHDRAW']" [value]="type">
                        {{type}}
                    </mat-option>
                </mat-select>
            </mat-form-field>
            <app-file-upload (onFileUploaded)="addFileToTransaction($event)"></app-file-upload>
            <button mat-flat-button color="primary" (click)="createTransaction()">Create</button>
        </div>
    </div>

    <div class="col-7">
        <h2>Your transactions</h2>
        <div id="list-transactions">
            <mat-card class="single-transaction" *ngFor="let tx of transactions">
                <mat-card-header>{{tx.title}}</mat-card-header>

                <mat-card-content>
                    <p>{{tx.description}}</p>
                    <p>{{tx.amount}}</p>
                    <p>{{tx.type}}</p>

                    <app-file-view *ngFor="let img of tx.images" [imageId]="img"></app-file-view>
                </mat-card-content>

                <mat-card-actions>
                    <button mat-button color="warn" (click)="deleteTransaction(tx.id!)">Delete</button>
                </mat-card-actions>
            </mat-card>
        </div>

        <mat-paginator
                (page)="onPageChange($event)"
                [length]="totalItems"
                [pageIndex]="pageIndex"
                [pageSizeOptions]="[5, 10, 25, 100]"
                [pageSize]="pageSize"
                aria-label="Select page">
        </mat-paginator>
    </div>
</div>
This is the wallet details component:
@Component({
    selector: 'app-wallet-details',
    templateUrl: './wallet-details.component.html',
    styleUrls: ['./wallet-details.component.scss']
})
export class WalletDetailsComponent {

    pageSize: number = 10;
    pageIndex: number = 0;
    totalItems: number = 0;
    totalPages: number = 0;

    walletId: string = '';
    wallet: Wallet | undefined;
    transactions: Transaction[] = [];

    emptyTransaction: Transaction = {
        title: '',
        amount: 0,
        description: '',
        type: 'WITHDRAW',
        walletId: this.walletId,
    }

    constructor(private route: ActivatedRoute,
                private walletService: WalletService,
                private transactionService: TransactionService
    ) {
        this.walletId = this.route.snapshot.paramMap.get('id')!;
        this.walletService.get(this.walletId).subscribe(wallet => {
            this.wallet = wallet;
        });
        this.fetchTransactions(this.pageSize, this.pageIndex);
    }

    resetTransaction() {
        this.emptyTransaction = {
            title: '',
            amount: 0,
            type: 'WITHDRAW',
            description: '',
            walletId: this.walletId,
        }
    }

    fetchTransactions(pageSize: number, pageIndex: number) {
        this.emptyTransaction.walletId = this.walletId;
        this.transactionService.list(this.walletId, pageIndex, pageSize).subscribe(pageResponse => {
            this.transactions = pageResponse.data;
            this.totalItems = pageResponse.totalElements;
            this.totalPages = pageResponse.totalPages;
            this.pageIndex = pageResponse.page;
            this.pageSize = pageResponse.size;
        });
    }

    createTransaction() {
        this.transactionService.create(this.emptyTransaction).subscribe(transaction => {
            this.fetchTransactions(this.pageSize, this.pageIndex);
            this.resetTransaction();
        });
    }

    onPageChange($event: PageEvent) {
        this.fetchTransactions($event.pageSize, $event.pageIndex);
    }

    deleteTransaction(id: string) {
        this.transactionService.delete(id).subscribe({
            next: (response) => {
                this.fetchTransactions(this.pageSize, this.pageIndex);
            },
            error: (error) => {
                console.log(error);
            }
        });
    }

    addFileToTransaction(data: FileUpload) {
        if (!this.emptyTransaction.images)
            this.emptyTransaction.images = [];
        this.emptyTransaction.images?.push(data.id!);
    }
}
And that completes our UI for the wallet app.
The UI is functional.
Conclusion
In this post, we’ve created the UI for the wallet. It can now talk to the backend to create wallets, and transactions. In the next posts, we are going to deploy this application to a live server.

I build softwares that solve problems. I also love writing/documenting things I learn/want to learn.