Table of Contents
Introduction
This post is what I wish I have when starting with RabbitMQ. It contains:
- A short introduction to the important concepts
- Lots of illustrations
- Working code examples.
Let’s get started.
Code Repo
The code in this post is available here on Github.
Important concepts
Here are the important concepts in RabbitMQ:
Exchange
A messaging component in RabbitMQ that receives messages from producers and routes them to queues based on rules known as binding keys.
Queue
A messaging component in RabbitMQ that stores messages until they are consumed by a consumer.
Producer/Publisher
A client that sends messages to an exchange in RabbitMQ.
Consumer
A client that receives messages from a queue in RabbitMQ.
Binding
A connection between an exchange and a queue in RabbitMQ defines how messages are routed from the exchange to the queue.
Virtual host
A logical grouping of exchanges, queues, and bindings within a RabbitMQ server.
Routing key
A message attribute that is used by exchanges to route messages to queues.
Message
A unit of data that is sent from a producer to a consumer via RabbitMQ.
Acknowledgment
A message sent by a consumer to RabbitMQ to confirm that it has successfully processed a message.
Channel
A connection between a client and a RabbitMQ server, over which messages are exchanged. For example, a publisher uses a channel to send messages to an exchange.
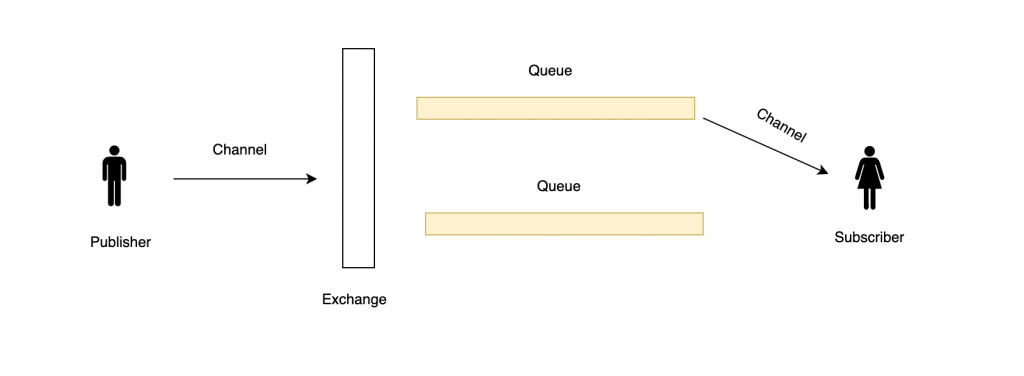
If you prefer a diagram, here it is+
Start a RabbitMQ instance
With Docker, it’s dead simple to start a RabbitMQ instance.
Here is the docker-compose file:
version: '3'

services:
  rabbitmq:
    image: rabbitmq:3-management
    container_name: rabbitmq
    ports:
      - "5672:5672"
      - "15672:15672"
    restart: always
The script above quickly starts a RabbitMQ instance and make it available at the address http://localhost:15672/
The default login is guest/guess.
Now let’s dive into each exchange types to understand what are their characteristics and what are their use cases.
Direct exchange
Let’s first discuss the mechanism of the direct exchange.
Publish a message to an exchange
Here is how you can publish a message to a queue using a Java client:
private static void sendMessageToDirectExchange() throws IOException, TimeoutException {
// create a connection factory
ConnectionFactory factory = new ConnectionFactory();
factory.setHost("localhost");
factory.setPort(5672);
// create a connection
Connection connection = factory.newConnection();
// create a channel
Channel channel = connection.createChannel();
// create a direct exchange
channel.exchangeDeclare(EXCHANGE_NAME, "direct");
channel.basicPublish(EXCHANGE_NAME, "datmt.com-routing-key", null, "Hello DatMT".getBytes());
// close the channel and connection
channel.close();
connection.close();
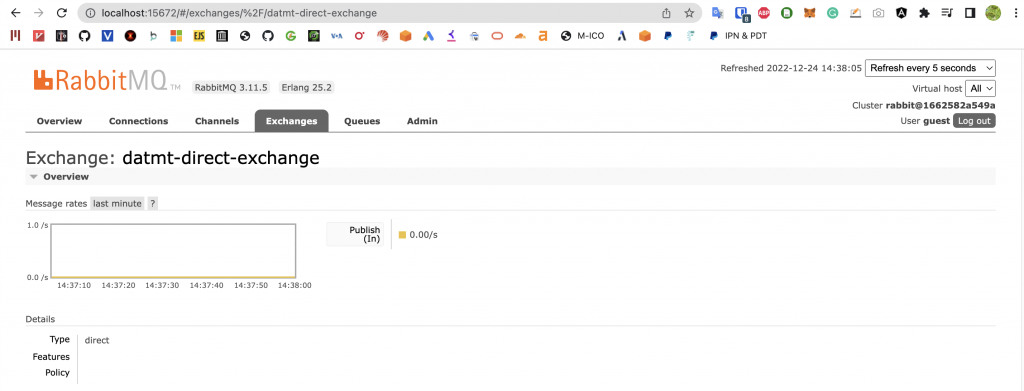
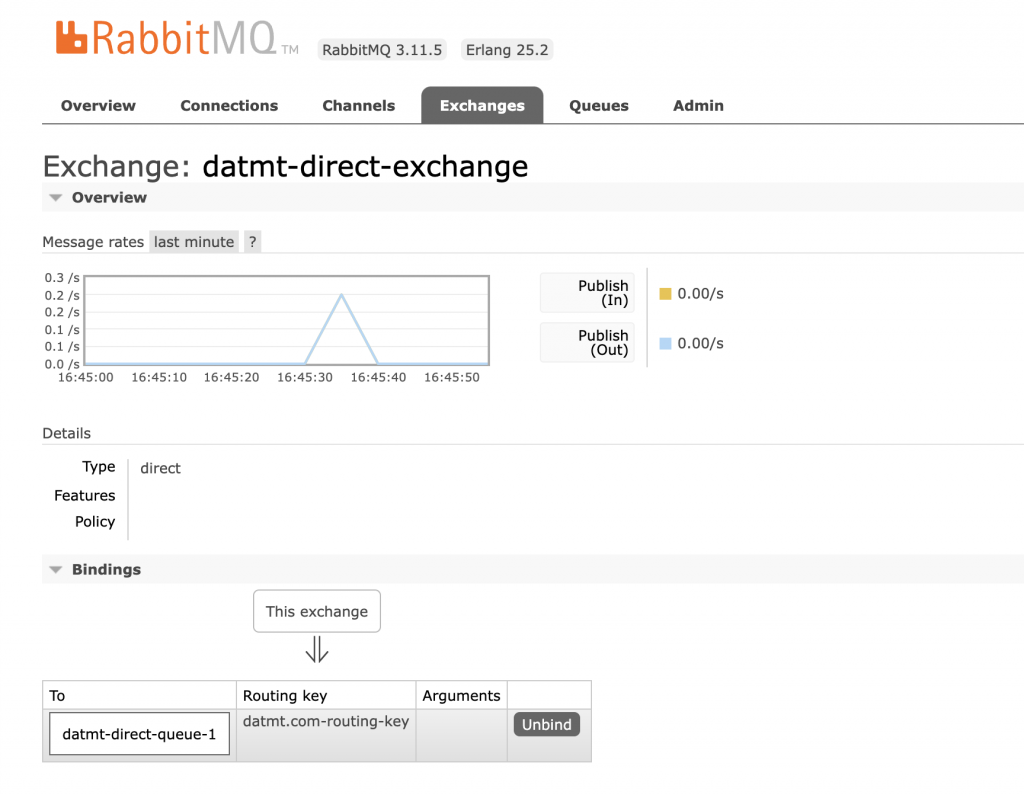
}Run the code and go to RabbitMQ, you can see the message is here:
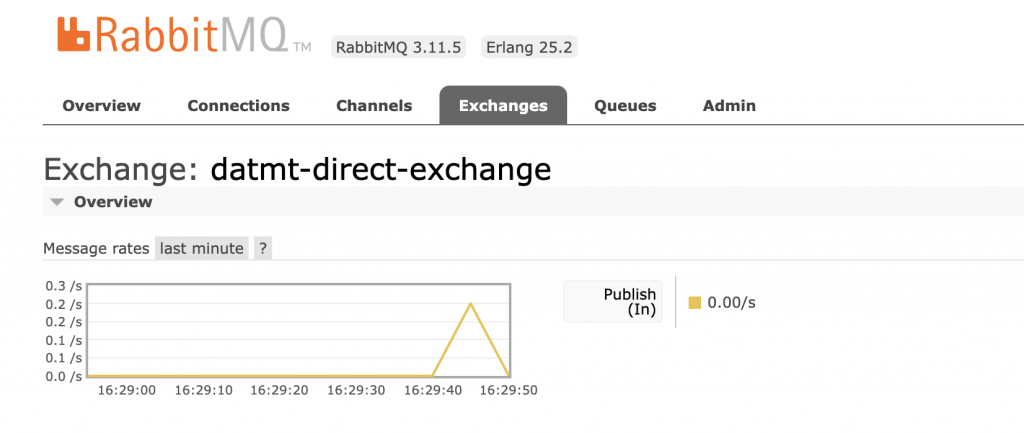
In this example, I’ve published a message to an exchange. However, the message is no where to be found since there isn’t any queue bound to the exchange. Thus, the message was discarded.
To persist the message, the must be a queue bound to the exchange.
You can bind a queue to an exchange in Java using this code:
channel.queueDeclare("datmt-direct-queue-1", false, false, false, null);
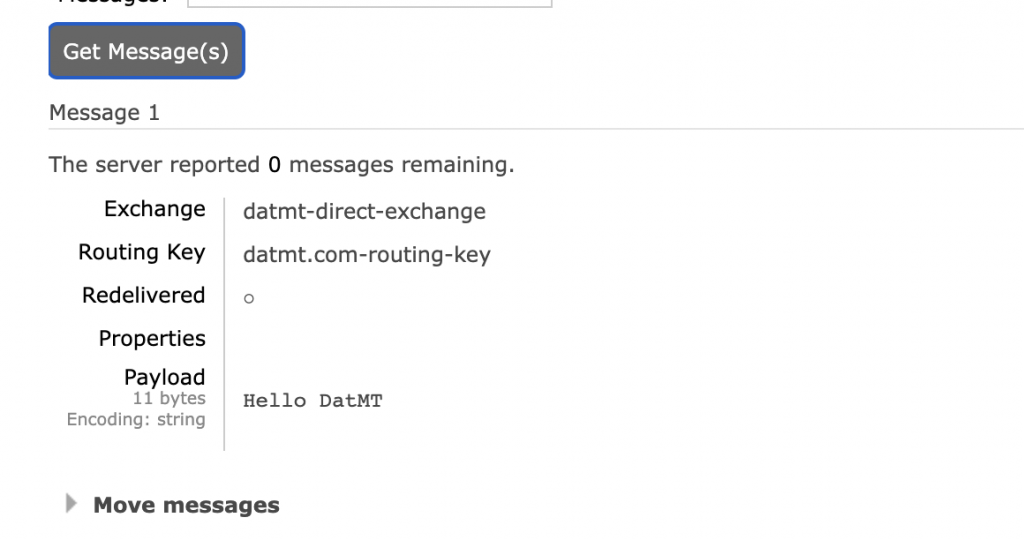
channel.queueBind("datmt-direct-queue-1", EXCHANGE_NAME, "datmt.com-routing-key");Now, if I run the code again, I can see the queue created (I don’t need to create the queue beforehand) and the message with its content:
Consuming message from a queue
Now we have messages on the queue, it’s time to create a consumer to consume them.
private static void consumeMessagesFromQueue() throws IOException, TimeoutException {
ConnectionFactory factory = new ConnectionFactory();
factory.setHost("localhost");
factory.setPort(5672);
// create a connection
Connection connection = factory.newConnection();
// create a channel
Channel channel = connection.createChannel();
channel.basicConsume("datmt-direct-queue-1", true, (consumerTag, message) -> {
System.out.println("Received message: " + new String(message.getBody()));
}, consumerTag -> {
System.out.println("Consumer cancelled");
});
// close the channel and connection
channel.close();
connection.close();
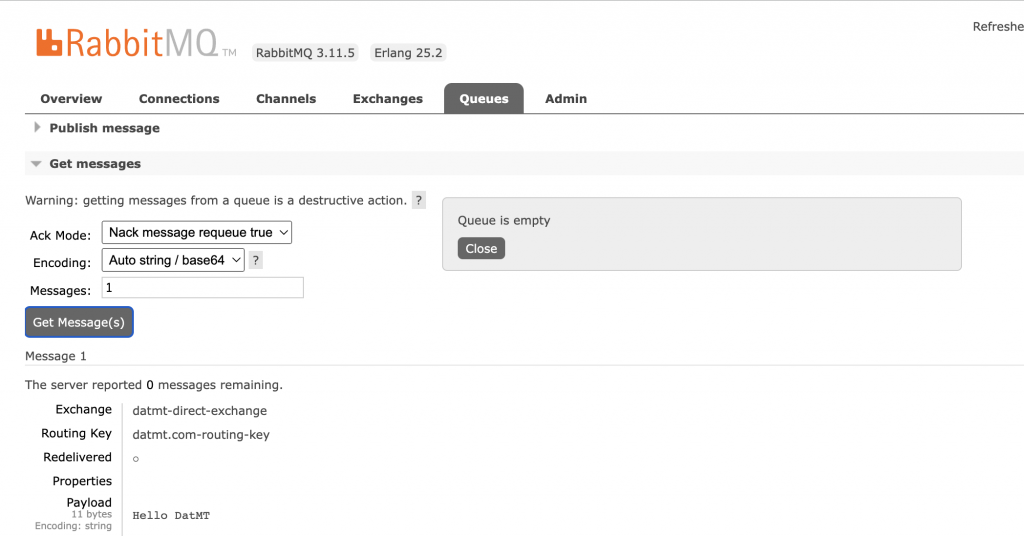
}As you can see, it is quite simple to consume messages from a queue. You don’t need to use the routing key when consuming messages. The routing key is used when publishing messages only.
After consuming all messages, the queue is now empty:
Fanout exchange
Let’s have a look at the fanout exchange and see how you can publish and consume messages.
A fanout exchange broadcasts messages to all bound queues, regardless of the routing key. In this exchange type, the routing key is not used but you still need to give it a non null value when using the Java client.
Publish messages to a fanout exchange
Here is an example of publishing messages to a fanout exchange:
private static void fanoutExchangePublish() throws IOException, TimeoutException {
ConnectionFactory factory = new ConnectionFactory();
factory.setHost("localhost");
factory.setPort(5672);
// create a connection
Connection connection = factory.newConnection();
// create a channel
Channel channel = connection.createChannel();
// create a direct exchange
channel.exchangeDeclare(FANOUT_EXCHANGE_NAME, "fanout");
channel.queueDeclare("datmt-fanout-queue-1", false, false, false, null);
channel.queueBind("datmt-fanout-queue-1", FANOUT_EXCHANGE_NAME,"fanout-binding-key-1");
channel.queueDeclare("datmt-fanout-queue-2", false, false, false, null);
channel.queueBind("datmt-fanout-queue-2", FANOUT_EXCHANGE_NAME,"fanout-binding-key-2");
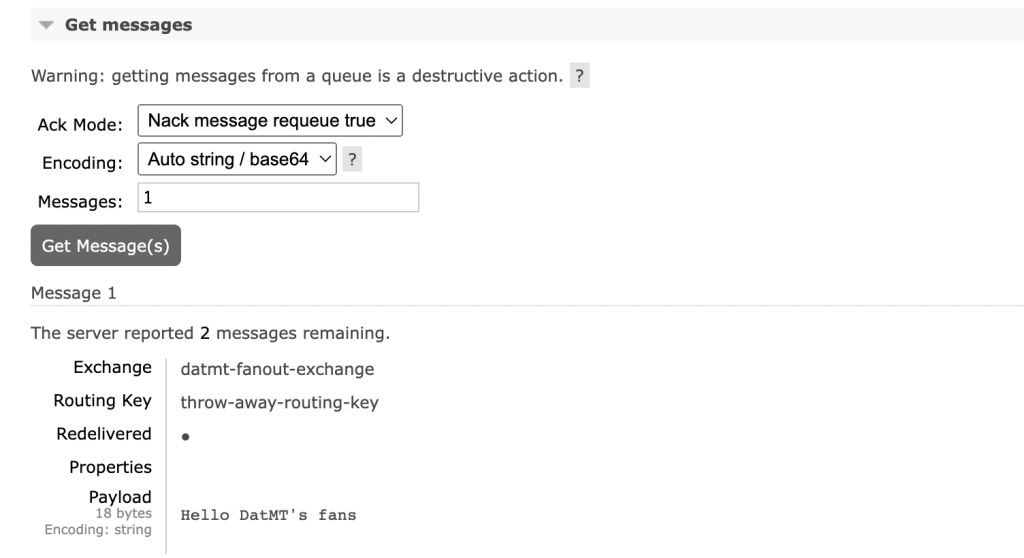
channel.basicPublish(FANOUT_EXCHANGE_NAME, "throw-away-routing-key", null, "Hello DatMT's fans".getBytes());
// close the channel and connection
channel.close();
connection.close();
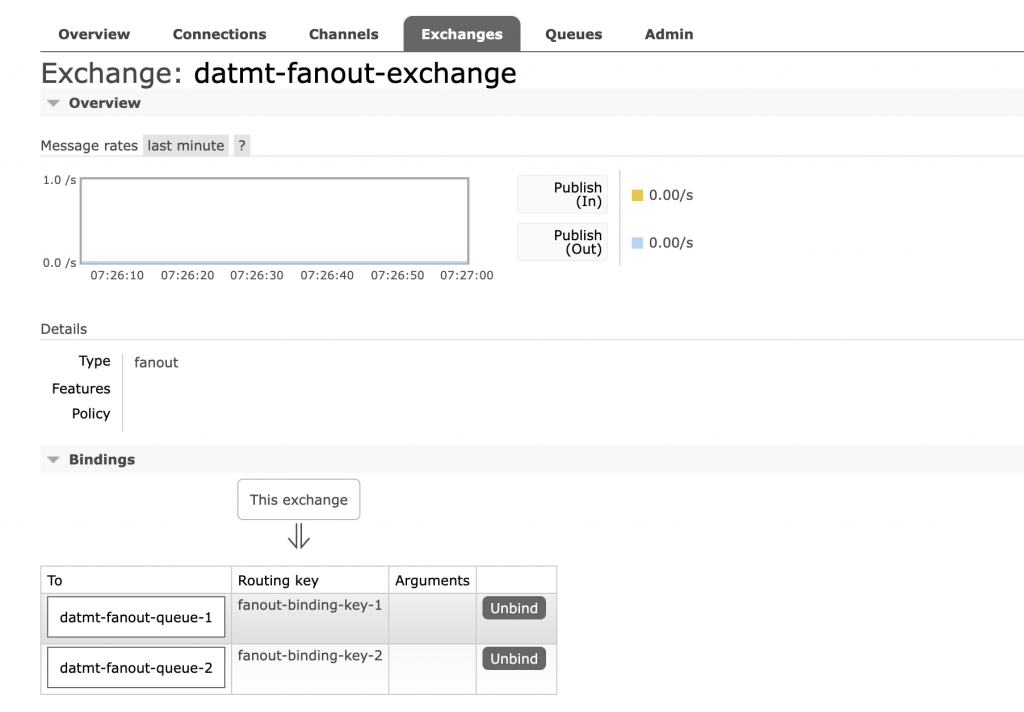
}In the code, I declared an exchange and two queues. You can notice that on lines 15 and 18, I put two different binding keys which are “fanout-binding-key-1” and “fanout-binding-key-1”.
However, when publishing the message, I used a different routing key: “throw-away-routing-key”. However, the message are available on both queues when I checked on RabbitMQ.
The code for the consumer is exactly identical to the one above.
Topic Exchange
Topic exchange is similar to direct exchange in a sense that you need to use a routing key to route message to queue.
However, topic exchange provides a more flexible way of routing: You can route messages by routing key pattern.
The routing key in topic exchange is composed of words separated by dot. For example:
datmt.com.order.created
datmt.com.order.complete
The two wildcard used are * and # where * match one word and # matches zero or more word.
Let’s consider an example:
Publish messages in topic exchange
Here is the code to publish messages in a topic exchange.
    private static void sendMessageToTopicExchange() throws IOException, TimeoutException {
        // create a connection factory
        ConnectionFactory factory = new ConnectionFactory();
        factory.setHost("localhost");
        factory.setPort(5672);

        // create a connection
        Connection connection = factory.newConnection();

        // create a channel
        Channel channel = connection.createChannel();

        // create a direct exchange
        channel.exchangeDeclare(TOPIC_EXCHANGE_NAME, "topic");
        channel.queueDeclare("datmt-topic-order-queue-3", false, false, false, null);
        channel.queueBind("datmt-topic-order-queue-3", TOPIC_EXCHANGE_NAME, "datmt.com.order.#");

//        channel.basicPublish(TOPIC_EXCHANGE_NAME, "datmt-topic-routing-key", null, "Hello DatMT topic".getBytes());
        channel.basicPublish(TOPIC_EXCHANGE_NAME, "datmt.com.order.created", null, "Order created".getBytes());
        channel.basicPublish(TOPIC_EXCHANGE_NAME, "datmt.com.order.complete", null, "Order complete".getBytes());
        channel.basicPublish(TOPIC_EXCHANGE_NAME, "datmt.com.order.complete.then.refund", null, "Order complete then refund".getBytes());

        // close the channel and connection
        channel.close();
        connection.close();
    }
In this example, on line 16, I used the key datmt.com.order.# as the binding key. That means any messages with the routing keys starts with datmt.com.order. will be delivered to this queue.
On lines 19, 20, 21 I published 3 messages that match the queue’s binding key pattern, thus I got all the messages:

Routing key and binding key
You’v seen I mentioned routing key and binding key at the beginning of this post and may find them confusing. Let’s consider this code:
    private static void sendMessageToTopicExchange() throws IOException, TimeoutException {
        //...
        channel.queueDeclare("datmt-topic-order-queue-3", false, false, false, null);
        channel.queueBind("datmt-topic-order-queue-3", TOPIC_EXCHANGE_NAME, "datmt.com.order.#");

//        channel.basicPublish(TOPIC_EXCHANGE_NAME, "datmt-topic-routing-key", null, "Hello DatMT topic".getBytes());
        channel.basicPublish(TOPIC_EXCHANGE_NAME, "datmt.com.order.created", null, "Order created".getBytes());
        channel.basicPublish(TOPIC_EXCHANGE_NAME, "datmt.com.order.complete", null, "Order complete".getBytes());
        channel.basicPublish(TOPIC_EXCHANGE_NAME, "datmt.com.order.complete.then.refund", null, "Order complete then refund".getBytes());

        // close the channel and connection
        channel.close();
        connection.close();
    }
On line 4, I bound the queue datmt-topic-order-queue-3 to the exchange with a key named datmt.com.order.#. This is the binding key. It is used when you bind a queue to an exchange.
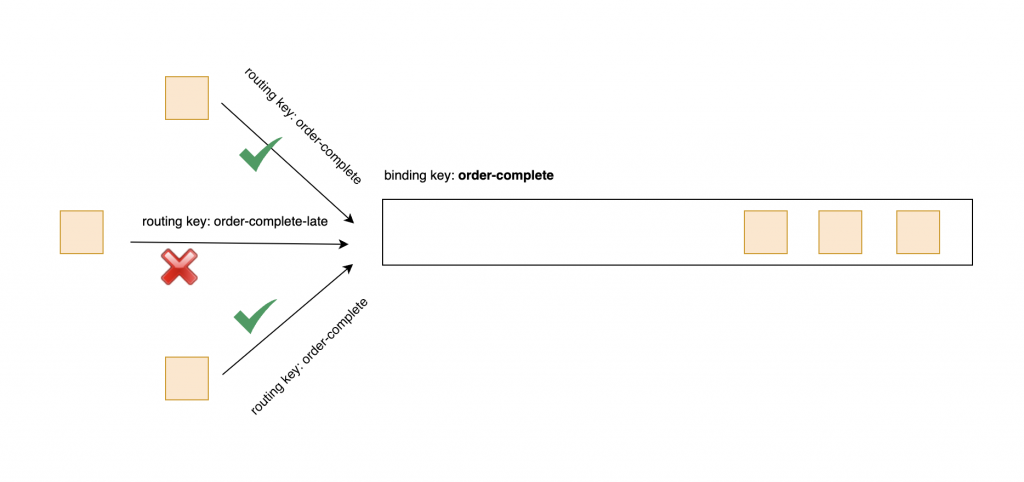
On the other hand, routing key is the key you use when publishing message. It’s similar to an instruction to the exchange to “deliver the message to the queues that have binding key exactly match this routing key (direct exchange)/or to the queues that have binding key’s patterns match this routing key”.
To make it more (or less) understandable, here is an analogy:
The queue said: “I am bound to receive any messages that have the routing key match this pattern”. <- this is the binding key
The publisher said: “Deliver this message, find the queues that have the binding key patterns match this routing key”.
Headers exchange
A headers exchange is a type of exchange in RabbitMQ that routes messages based on the header fields of the message, rather than the routing key.
In a headers exchange, the routing key is not used to route messages. Instead, the exchange looks at the header fields of the message to determine which queues the message should be routed to. The header fields are specified by the publisher (also known as the producer) when the message is published to the exchange, and they can be any arbitrary key-value pairs.
This is a simple example of headers exchange:
private static void sendMessageToHeadersExchange() throws IOException, TimeoutException {
// create a connection factory
ConnectionFactory factory = new ConnectionFactory();
factory.setHost("localhost");
factory.setPort(5672);
// create a connection
Connection connection = factory.newConnection();
// create a channel
Channel channel = connection.createChannel();
// create a financialHeaders exchange
channel.exchangeDeclare(HEADER_EXCHANGE_NAME, "headers");
//configure financialHeaders
Map<String, Object> financialHeaders = new HashMap<>();
financialHeaders.put("department", "financial");
Map<String, Object> accountingHeaders = new HashMap<>();
accountingHeaders.put("department", "accounting");
// declare and bind queue using financialHeaders
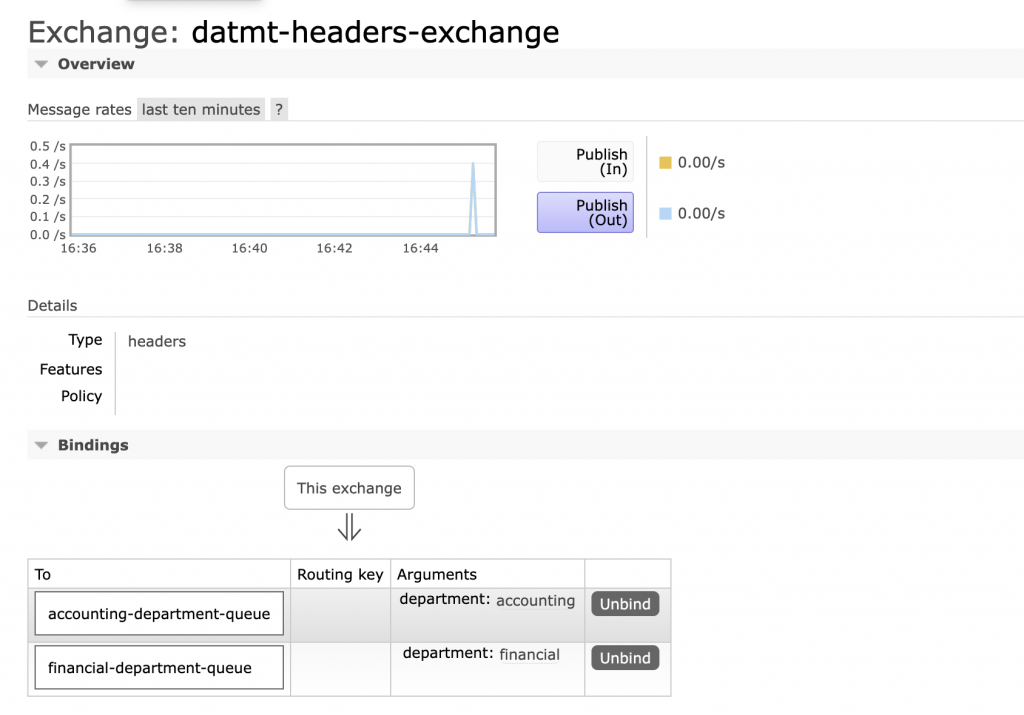
channel.queueDeclare("financial-department-queue", false, false, false, null);
channel.queueBind("financial-department-queue", HEADER_EXCHANGE_NAME, "", financialHeaders);
// declare and bind queue using financialHeaders
channel.queueDeclare("accounting-department-queue", false, false, false, null);
channel.queueBind("accounting-department-queue", HEADER_EXCHANGE_NAME, "", accountingHeaders);
// publish message to financialHeaders exchange
var financialProps = new AMQP.BasicProperties().builder().headers(financialHeaders).build();
channel.basicPublish(HEADER_EXCHANGE_NAME, "", financialProps, "News for the financial department".getBytes());
var accountingProps = new AMQP.BasicProperties().builder().headers(accountingHeaders).build();
channel.basicPublish(HEADER_EXCHANGE_NAME, "", accountingProps, "News for the accounting department".getBytes());
// close the channel and connection
channel.close();
connection.close();
}
The code is quite simple. From lines 17 to 21, I declared two maps that have header fields “department” set to “financial” and “accounting” respectively. These two maps are used to declare two queues from lines 25 to 30.
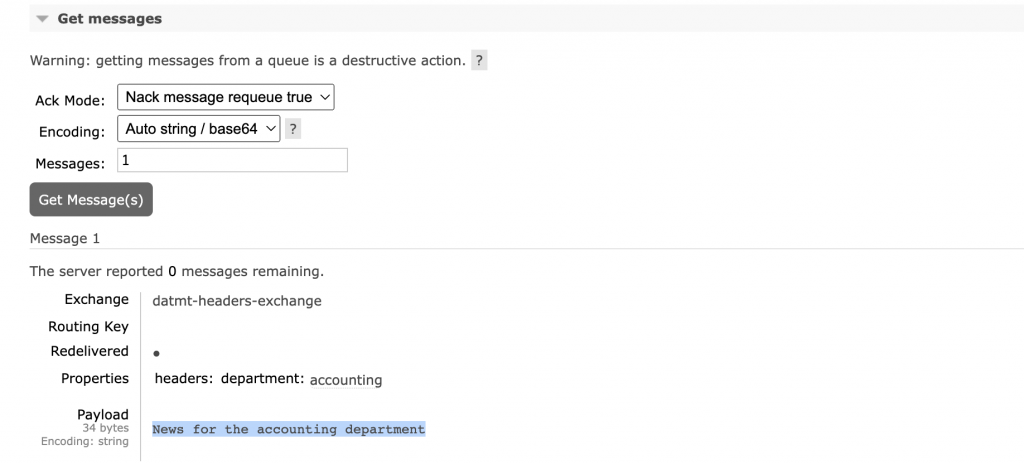
Lines 33 and 34 publishes message to the financial queue and lines 37, 37 publishes message to the accounting queue.
As a result, the messages can be seen on each queue:
Conclusion
This is quite a long post that covers the basic of RabbitMQ. Now you know the fundamental concepts and how to publish and consume messages. In the next posts, I’m going to introduce more advanced topics.

I build softwares that solve problems. I also love writing/documenting things I learn/want to learn.